I’ll be approaching both of these shots in essentially the same way. These Shots both contain close ups of the Jelly sliding on or off of a table, with lots of wobbliness, so follow through and overlapping action.
Alan Becker’s Principles of animation Series has a very nice 2D animation of an Antennae on this guy’s head, I want the Jelly to move in a similar way, so wobbly and fluid. I’ll Simply move the top control on the Jelly to move it around and go into the graph editor for slow in and outs. Another movement in this clip that I’ll be referencing is the Flower Pot, when the waiter grabs the plate.
(0:22) (0:49)
Enilenis Has some really awesome Jelly Animation that I’ll be referencing to remind me what moving Jelly looks like
Alan Becker – The Squash and stretch in the Boot is quite nice
(0:12)
Shot Two:
This shot will consist of most of the movement in this animation, with the Waiter zipping from one side of the room to the other, with the Jelly following through closely behind. I’ll be changing the FOV/Focal Length of the Camera to make the shot really wide, Ill be referencing the camera movement in this Clip of a Race Car driving past to Exaggerate the speed at which the Waiter is moving.
(0:09) (0:27)
Alan Becker Principles of animation- Yes more of this guy, I want the Waiter to move like this TV antennae, Rigid with unbroken posture.
(1:15)
Wile E Coyote Take off – I want to give the Waiter some anticipation before he dashes off
(0:33)
Other Reference Material:
Hanna Barbera’s Saturday Cartoons are all great references, such as the Flintstones, Scooby Doo and many others.
I’m aware that allot of my reference is of 2D animation and particularly from Alan Becker, but I believe like Eadweard Muybridge who shot the reference for a running horse, Alan Becker has visually documented and broken down the principles of animation extremely effectively.
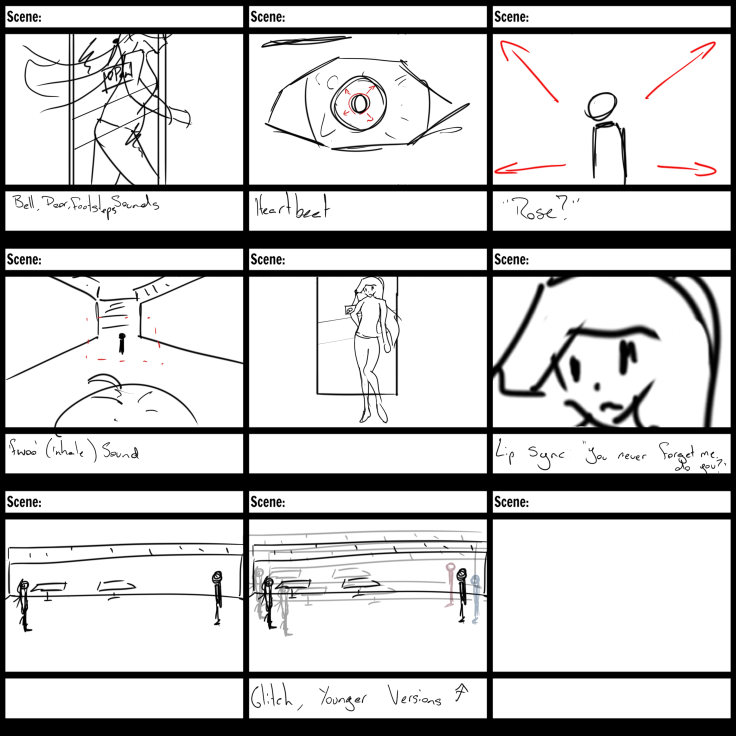
Story Board:
Panels 1-3 will mimic the flower pot from Alan Becker whilst Panels 7-9 will be referencing the Antennae on that guy’s head. Panels 4-6 use the race car camera techniques and in Panel 6 the Waiter replicates the motion of the TV Antennae.
This is the only real work I’ve done with animating in 2D to any kind of standard, this wasn’t just my work however, (mini studio project). Looking back my work is almost laughable, I can do way better than that.
What I want to achieve
I want to achieve an adept understanding of After Effects, 2D Rigging and Lip Syncing, I will achieve this by creating a body of test pieces and hopefully a final product however the final product is secondary to the tests.
Mood:
I first came up with the concept for this project by doing this:
Listening to this:
Whilst watching this in mute:
This is what I’m aiming for in sense of mood.
Style:
The idea of characters being defined by colour
To constantly have very interesting camera angles and effects similar to this is something I want to replicate for this project (Such as the vertigo effect 3:38).
What do I need to learn?
I want to overall sharpen all areas of my 2D animation skills as aside from briefly touching on it early on in the course I haven’t had much opportunity to play around with it, making me feel as though it’s too early to rule out 2D.
I will be living in After Effects, specific Duik. I want to learn 2D rigging, character and facial hopefully being able to make a lip syncing rig thing in there too. I want to learn the generally how to use the program so I’ll be making a bunch of different test pieces and effects.
Elevator Pitch
I will be creating a body of test pieces to learn the ins and outs of AE, through my test pieces I’d like to create a 2D proof of concept short for a story about a Guy suffering from repetitive memory loss. Focusing on Lip syncing, 2D Rigging and compositing.
I got some excellent feedback that I can use to improve my concept. Firstly more sound effects such as the sound of the plate which I’d already intended on adding, but also some background chatter, at the start a service bell as well as some animation to indicate it sliding out to service. Some pitter-patter footsteps, some extra jelly wobbles and as a desirable at the end pan up to a 2D customer and their reaction (Awkward giggle or shock).
I also received feedback on my model sheet to make the waiter less of a pill and more of a human, referencing characters such as Gene from Wreck it Ralph and the camera guy from cloudy with a chance of meatballs.
I’m much happier with the updated version of my character looks.
Wednesday:
I did a rough pass on some storyboards for my specialization, after some feedback I’m going to be adding am establishing shot at he start to make it clear that the eye in shot 2 isn’t the girl’s in frame 1.
Sunday:
I modeled my waiter and although it’s not perfect, it’s more than good enough for me for a rapid project like this.
What have I learned this week?
Revisited 3DS Max and different methods within it like Turbo Smoothing.
Well it’ time to get going again! Studio 2 is finally here and it looks rather interesting. there are less overall projects but they are to be done faster and at higher qualities, really stress testing us aren’t they? The first project being the rapid production project where we have to go through the entire 3D pipeline solo in 6 weeks, and the second being Specialization which is essentially the same as last trimester but it matters allot more, not to forget out cross-discipline projects.
What have I made this week?
Monday:
I got the Idea for a new story and began developing it
Tuesday:
I wrote up a much more coherent version of the story, I will later iterate on this version and upload it on google docs
In class we started work on the rapid production project, I created a basic initial pitch, scrapped it and made a new one
On Wednesday we ran a workshop on Lip Syncing and I learned allot from that, when lip syncing it’s important to think about the sounds, not the letters, and that the way mouths move can be mis-interpreted greatly without any sound, an example of this is when you say “Elephant Juice” or “Colorful” and you take away any sound then you can read the lips as ‘I Love You’
I believe everyone in the Project was very keen to work on a Halo Project as we had discussed that we all had a mutual love for the game. Lucas in particular at least made the effort to communicate semi regularly, whereas I only noticed Jackson say Hello and It was nice working with you throughout the entire project.
This lack of communication, or at least, effect communication was this project’s downfall. The first time I received any indication of what the audio would sound like was about two weeks ago when the music was so quiet I had to blast it to 100% to hear anything while the sound effects would practically burst my ear drums. Not a big problem, easy fix I can solve with any editing software (which I ended up doing). The big issue about the Audio that I had, was it sounded like it would better suit being in the background of an Aquarium rather than the foreground of animation focused around an Human Weapon.
A week later there was multiple versions of very very similar audio posted to which I asked Lucas to explain the difference before I could hear it, again it was practically impossible to tell due to how quiet it was and that it still belonged in a fish tank.
Things were being pushed too late so I ended up editing the Audio myself and creating this video and calling it a Day. However I used the Audio from the Halo 4 Teaser Trailer and it ended up syncing up and generally sounding much better.
this went as well as I could possibly have hoped for. Liam was great, constant communication and updates with the audio, and meetings to troubleshoot any issues was completely fantastic. Not only that but he definitely went above and beyond, making multiple different versions of the audio and making work in a way so that depending on where you are inside the environment the different music would play and flow together perfectly. Not much to say about this project except to keep shouting praise at Liam and the rest of my team, absolutely flawless work from both parties involved.
I’m quite happy with how the end result turned out for this project, obviously it’s nowhere near perfection, it looks a bit floaty, his walking is hardly human, his roll slides left to right and I would like to do another pass on the project. However I’m still very happy with how it turned out in the end, the environment and general animation came out very close to my original concept.
A major issue I came across whilst animating wasn’t gimble lock but it did look fairly similar. It was in fact the script that allowed us to switch between IK and FK, there were multiple points where I’d made the switch and as I continued to animate the more intense the changes would happen, however I managed to smooth allot of this out by going back and replacing each frame in as FK and ridding the animation of IK.
If I were to restart this project I would put in more obstacles and focusing on low-no gravity and speeding it up, my current animation mimics normal gravity and is much too slow.
I used the audio from the Halo 4 Teaser Trailer as I referenced this video quite allot for this project and it ended up syncing up quite well.
I learned how much personality and attention to detail goes into the ‘simplest’ of animation such as a walk cycle.
I gained a basic understanding of how Maya works, modelling and animating within it, and that I find Maya quite infuriating, I can see why and how it would be potentially the best animation program package available due to it’s customisation and functionality with scripts, however I personally don’t want to be a mechanic so I don’t want to get involved under the hood of my car, I just want to enjoy driving it, and for that reason I believe Max is a program more suited for me. However I do believe I should spend more time in Maya and become proficient with it.
I am quite happy with how the overall project went, the concept of the the project and how the end result turned out.
To begin with I once again was way too ambitious, I wanted five completely different rooms with different models and textures, obviously looking back on it now there’s no way I could have done that and I’m so glad I scoped the project down and focused of efforts into very specific areas. this way I saved allot of time using the models and textures from the aftermath project, then repeating the same room five times and doing my best to completely changing that room through Lighting and Post-Processing.
If I were to revisit this assignment I would definitely do an exterior environment or a least include a window into the room. I would also change the interior of each room, even if I only move the practical lights around, as I found it extremely difficult after a couple of rooms to keep changing the lighting when all the lights are the exact same. Volumetric fog and lighting is something I’d like to look into further in the future.
A major issue I had with the project was due to the sheer volume of Book assets I had in the level so every time I had to build the lighting, even at a very low quality it took quite a long time to do, so next time I think I’ll assemble the bookshelves with the books on in in max and make it a single asset instead of 6000.
I learned allot by doing this project, I’d never really played with lighting in 3D before, so I learned the basics of lighting as well lighting maps, a basic understanding on Volumetric Lighting, how static and dynamic lighting interacts with eachother. On top of Lighting I also focused on Post-Processing and Learned so much about that too, colour grading and how to create different effects with that as well as how to create LUTs in Photoshop and create some pretty crazy effects that way.
I don’t believe that Lighting and Post-Processing is a career path that I’d like to go down, though I found it very interesting to do I also found that it wasn’t very enjoyable, perhaps if I was lighting different environments compared to the same one over and over.
These past two weeks have been basically finishing, Polishing and Rendering EVERYTHING!
What Have I Learned?
Maya’s Arnold Renderer is a little confusing and that I’ll need more time to understand how to light within it and get certain objects to render, like the Helmet and Gun for my Obstacle Course.