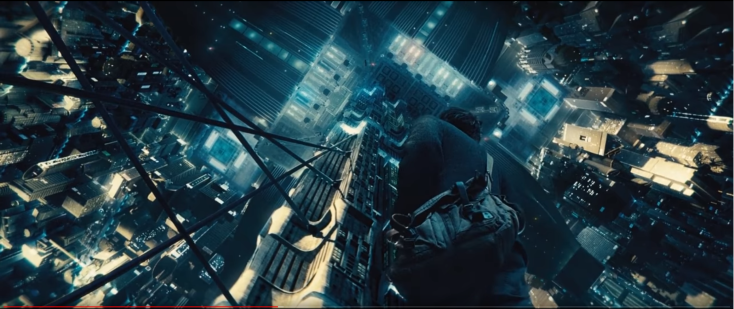
This week I made a new showreel, I wanted to try something different than the usual showreel, so I made it play as a game. I thought it was pretty cool but i forgot music so its not very entertaining and recording first person game play isn’t very aesthetically pleasing so I think I’m going to redo my showreel soon.
I also did a bunch to typing, writing up my cross-disc post mortem, touching up my world builders post-mortem, and my holistic grade presentation
But it’s the final week there’s not much to do this week except get everything finished off and tick those last few boxes
I created an Audio visualiser for Tomas Rezes’s haunted Forest sound track, We communicated through Texting and E-mails…
What went well in the project, and why?
The communication was very good with Tomas, he gave me some feedback and reference images to use, we constantly updated each other whenever we had done something, seen something or just had an idea on how to do something.
The project was very streamlined, I had preemptively created a master audio visualiser After Effects file where I could change the settings and the style very easily before I had Tomas on board, this minimised the workload I had to do later on after Tomas and I got in contact.
What didn’t go well, and why?
The only thing that didn’t go well was that when I rendered it out I stuffed up and it repeated towards the end and I didn’t realise so the timing was off, but because of our awesome communication Tomas spotted it and I just had to do a quick re-render.
What would you do differently next time?
Not much, doing the majority of the workload before finding an Audio Student who needed some Cross Disc was extremely efficient. Next time perhaps doing more Audio Visualisers with different effects such as a ticking clock instead of the progress ring.
What did you learn about other discipline’s workflows?
I didn’t get the opportunity to learn anything about the Audio workflow as this project was very much separated as Tomas had completed the Audio before we made contact so I just received the finished audio mp4 file.
I communicated with Liam primarily though Facebook messaging but we also met up face to face and discussed and gave feedback multiple times throughout the trimester, which was extremely pleasantly surprising.
What went well in the project, and why?
The constant communication has been the highlight of this cross disc, I’ve never taken part in a cross disc project with anyone who’s given a shit about the project before, it actually feels like a collaboration instead of me just doing someone else’s grunt work.
What didn’t go well in the project, and why?
Liam was waaaayyyy too keen at the start and dived straight into developing tracks and FMOD sessions before we had even thought about touching UE4 but that’s really just the best problem to have.
What would you do differently next time?
As this project is still currently ongoing it makes it a little difficult to answer this. Next Tri I’d like to work more directly with Liam, especially with the dialogue, be the director for the voice acting or at least have a more control / be more involved with the production of it.
What did you learn about other discipline’s workflows?
I didn’t learn anything about the Audio workflow outside that the audio is in an FMOD session, how that works.
The goal is to create a material for my AI that can shift between two states after an interaction.
Fresnel – Textures facing the camera = 0 , Textures 90 degrees to the camera = 1 creating an edge fall off effect
Screen Aligned UVs – Aligns a texture’s UVs based on the angle of the camera
Panner – Pans a texture
Nodes are quite self explanatory and holding Alt and Ctrl gives more information so it’s more about practising the logic of creating materials than knowing what individual nodes do and how to use them.
I quite liked this specific effect from DeepSpaceBanana’s ‘Turbulence’. From their notes perhaps the biggest thing was that you can create custom nodes. That’s extremely powerful, the MF_FloatNoise2D comment on the image below was created based off a custom node DeepSpaceBanana created and used to create this and a few other effects.
So I did my best to recreate their ‘Turbulence’ effect and combined them all together
I’m very happy with the result of this material, but I want to take it a bit further. I watched this Shaders training where they create a material reminiscent of Saurons Eye where the eye follows the player. My thought was that if I could make the pupil the shape of the AI I could use that to have the AI follow the player.
Didn’t go well, they didn’t go into great detail as to how they created the material but the Eye is made up of radius’s and things subtracted from each other, not a texture like I’d thought. I’ll look into how to make a model track a player soon…
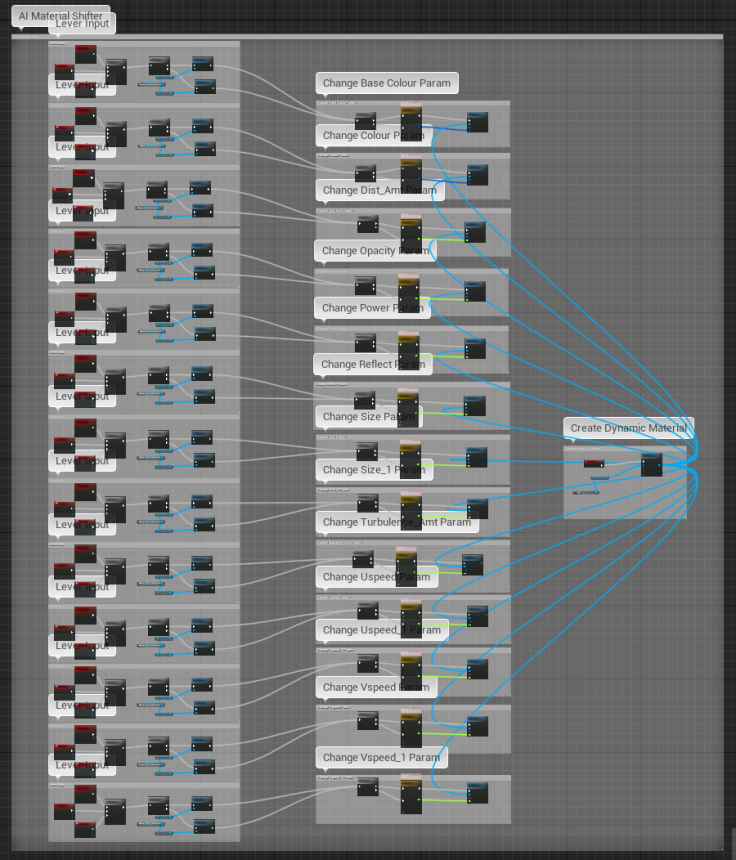
Since the AI has 2 states there has to be a way to get it to shift between those states but I was stumped so I talked with Steve and with his help we created a modular blueprint to animate between different parameter values which is perfect.
FlipFlop – Toggles between giving output A or B after each consecutive input
Dynamic Material – makes the material subject to change or Dynamic
Timelines – changes a value (Float, Vector, Event or Colour) over time using a graph editor
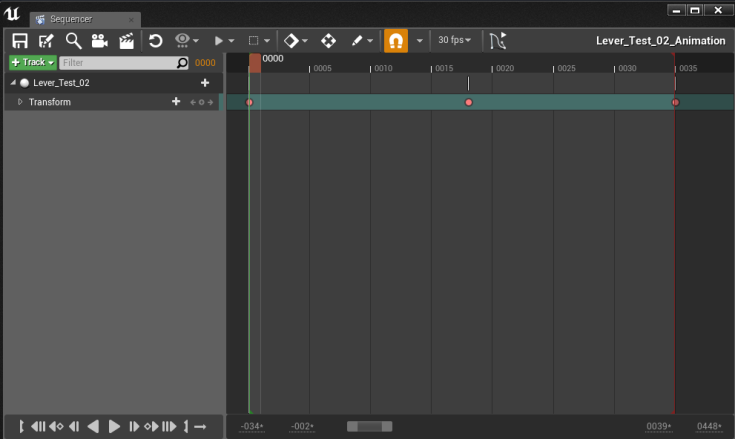
This was dated and not very helpful but I found the matinee which has now been replaced with sequencer. More a little refresher.
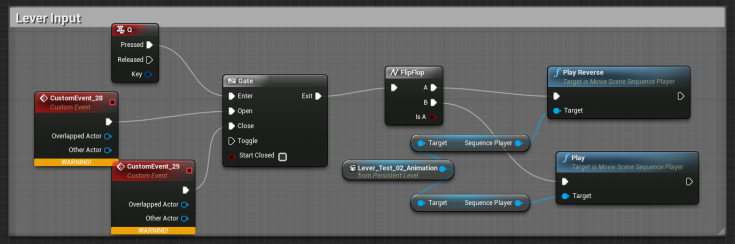
After I keyframed the Lever rotation I could reference the animation in the blueprint and kept following the above tutorial to create the rest of the blueprint
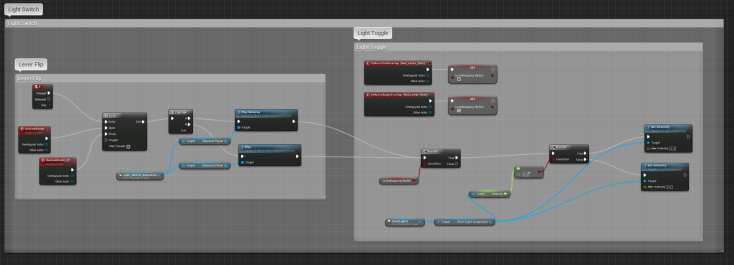
Then after hours of trouble shooting I duplicated the heck out of it and replaced every input key with a ‘Lever Input’ BP and created this monster
A 4 second gif to display everything I’ve done in a month… Animation in a nutshell…
I took the ‘Lever Input’ and plugged it into an old test light switch I made ages ago and tada!
The goal is to create a material for my AI that can shift between two states after an interaction.
Fresnel – Textures facing the camera = 0 , Textures 90 degrees to the camera = 1 creating an edge fall off effect
Screen Aligned UVs – Aligns a texture’s UVs based on the angle of the camera
Panner – Pans a texture
Nodes are quite self explanatory and holding Alt and Ctrl gives more information so it’s more about practising the logic of creating materials than knowing what individual nodes do and how to use them.
I quite liked this specific effect from DeepSpaceBanana’s ‘Turbulence’. From their notes perhaps the biggest thing was that you can create custom nodes. That’s extremely powerful, the MF_FloatNoise2D comment on the image below was created based off a custom node DeepSpaceBanana created and used to create this and a few other effects.
So I did my best to recreate their ‘Turbulence’ effect and combined them all together
I’m very happy with the result of this material, but I want to take it a bit further. I watched this Shaders training where they create a material reminiscent of Saurons Eye where the eye follows the player. My thought was that if I could make the pupil the shape of the AI I could use that to have the AI follow the player.
Didn’t go well, they didn’t go into great detail as to how they created the material but the Eye is made up of radius’s and things subtracted from each other, not a texture like I’d thought. I’ll look into how to make a model track a player soon…
Since the AI has 2 states there has to be a way to get it to shift between those states but I was stumped so I talked with Steve and with his help we created a modular blueprint to animate between different parameter values which is perfect.
FlipFlop – Toggles between giving output A or B after each consecutive input
Dynamic Material – makes the material subject to change or Dynamic
Timelines – changes a value (Float, Vector, Event or Colour) over time using a graph editor
This was dated and not very helpful but I found the matinee which has now been replaced with sequencer. More a little refresher.
After I keyframed the Lever rotation I could reference the animation in the blueprint and kept following the above tutorial to create the rest of the blueprint
Then after hours of trouble shooting I duplicated the heck out of it and replaced every input key with a ‘Lever Input’ BP and created this monster
A 4 second gif to display everything I’ve done in a month… Animation in a nutshell…
I took the ‘Lever Input’ and plugged it into an old test light switch I made ages ago and tada!
Still yet to produce anything worth putting into a showreel I think it’s about time, however the question remains of what. Something I would like to specialise in one would presume, however that’s quite troublesome when I want to specialise in everything. So I’m going to do just that to the best of my ability.
For my specialisation I believe it would be best to take the hint and use my time to advance my final project, two birds one stone. I’ll essentially be doing a vertical slice, taking one element and developing it and all its functionality through to the end. Meet Trinity, the AI.
A very basic knowledge of UE4, simple triggers and materials. Basic modelling in 3ds Max then import to UE4, texturing in Quixel, I’ve also made a Snow particle effect and material. As far as relevance to this project this is all my previous experience and skills I have. In essence I know the UI for UE4 and what a few buttons do and I’m looking to expand that knowledge.
So what do I have to learn to pull off this project? Well to figure that out we need to know what this AI is functionally capable of other than just looking pretty.
The AI needs to talk to the player, Text on the screen. Change its state of mind, two separate projects that interchange either randomly or due to player interaction. There have to be Levers that trigger different events, essentially Animated buttons.
So I kind of touched on those things a little but it’s time to elaborate.
AI VFX
Steve showed me a VFX artist, Taizyd Korambayil and their website where they go into great detail as to how they created their VFX, I plan to attempt to replicate and tinker with some of their VFX, specifically their Star Wars hologram one. Steve has already replicated the effect and was kind enough to upload it to the student resources, however as excellent as it is, it’s not quite what I’m looking for. Trinity is an older AI, I want those old TV lines similar to the Fallout 4 menus and other smaller notes that I’d like to tinker with.
Levers are simple enough really, I imagine they’d be the same as getting a basic door interaction to work, similar to the workshop we did before Aftermath.
Examples and Initial Research:
Dialogue/Text pop-ups
Now this is something that I, as I’ve not looked into anything like this, can only currently speculate as to how to do. However I would like to clearly differentiate the two from each other, if possible I’d like to give the AI’s dialogue a glitchy font, and for the hints or other text pop-ups a steampunk or Victorian look, similar to The Room’s.
Examples and Initial Research:
(1:46)
Other Resources
Thought Process
Create Proxy AI Console
Apply sourced materials in UE4
Create Default AI VFX
Tinker with AI VFX
Polish VFX
Import AI into UE4 scene
Be happy
Create test dialogue
Research custom dialogue font/appearance
Implement
Import into UE4 scene
Talk to the AI
Be happy
Create Proxy Levers
Import
Create Interactive Trigger and animations
Create Events
Be happy
Polish scene
– If there’s still time which there undoubtedly will not be
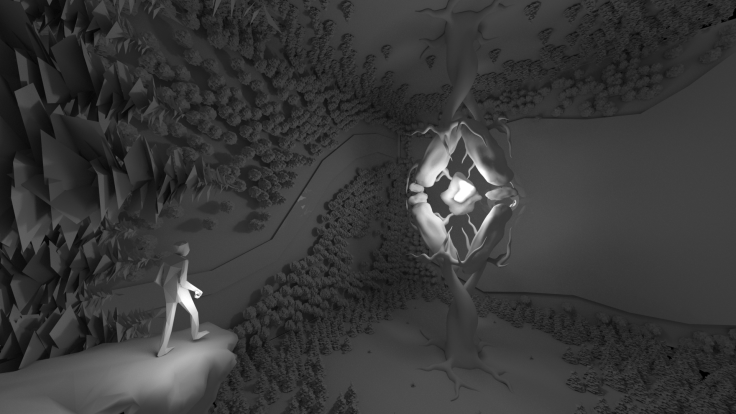
The goal of this project was to develop an original concept and the world around it and to create a single static image to capture it.
Positive
Generally everything
I’m pretty happy with the entire project, it turned out really well and is my best piece to date, continually asking for, receiving and iterating on feedback into the project as much as possible I was able to develop my concept further than I have ever before.
Shading / lighting is something I often shy away from but I feel I’ve made huge strides with improving those skills with this project.
The result closely reflected my initial concept
Whenever I have a new idea I always rush into it and try painting the final image but being forced to take my time and flesh out the concept over a few weeks really helped solidify what I wanted from it before I’d put too much blood sweat and tears into it.
Concepting and iterating and generally developing the world to build a solid foundation for the world to start with before starting on the shot at all.
Process
Other than the workflow feeling a bit backwards at times I could still see the benefits and gained a lot from taking the time to do so many different workflow. As a class we made suggestions on how to streamline the World Builders process. I suggested that we rearrange the order of a few of the tasks and when we learn them, such as doing the shot deconstruction before starting to do the composition of the shot and the 3D blockout after that then going and doing the paint overs.
Negative
Effects
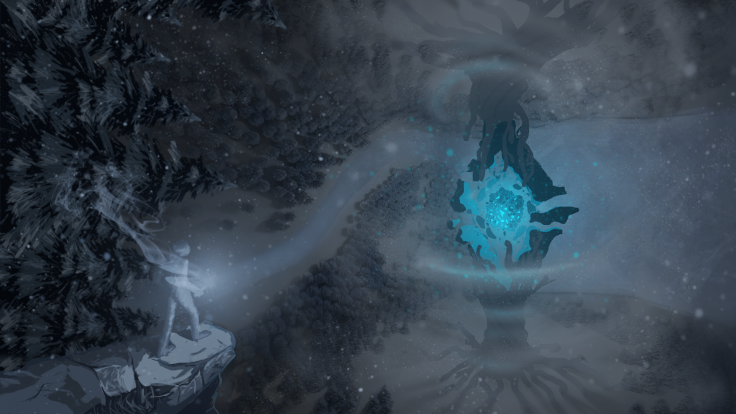
As much as I love the particle effects I’ve made, if I had more time I’d love to tweak some things (which I will later)
The Snow, I can make out the bounding box of the particle system so I’d just need to change the numbers a bit. The Smoke, it looks unnatural with how fast and horizontal the snow is moving, again I’d just have to play and fiddle with the settings for a little while. Generally just leave more time for post-production.
Time Management
My time management became an issue towards the end of the project. Although I recognise that the particle effects look really good in the end, if I had more time I’d love to tweak some things. This can easily be done by changing the bounding box variables and just switching up the numbers a bit.
The smoke looks unnatural with how fast and horizontal the snow is moving. It looks a bit unrealistic when you look at the piece as a whole. If I had managed my time better I would like to have fiddled with the settings more. And generally just leave more time for post-production and effects.
Polish
One big thing that annoys me now that it’s finished is that the polish of the foreground is waayyyyy higher than the mid or the background, destroying any continuity of the art.
I’m not over the moon with the texturing of the ground and the river/lake, compared to the detail in the rock, trees and the crystal the lake might as well be blank space. One way I could catch this happening would be to render out earlier iterations and take a step back to look at it, take a break then come back analyse the thing as a whole.
Conclusion
I’ve learned lots of different workflows and methods on how to pump out concept art faster, I’ve learned basic composition rules and basic colour theory. I learned how to create awesome particle systems in AE using Red Giant’s Particular Plug-in buuuut my trial’s gonna run out soon unfortunately.
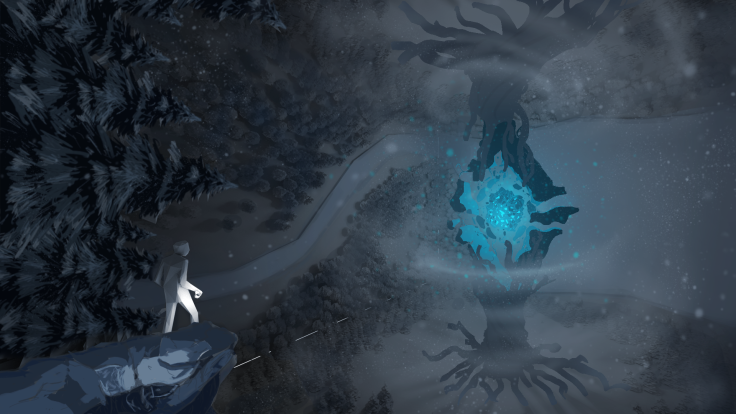
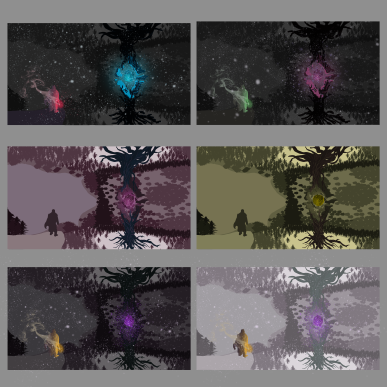
I played around with the colour key a little bit and I found that to my surprise I preferred the idea of turning it into a night scene
I ended up returning to Blue, it looked Kinda of strange without blue, i settled with orange as it’s a complimentary colour but i personally don’t like orange very much so I pretty much abandoned it straight away.
Man was getting the right composition to work in 3D tricky or what? Ended up making it a bit hacky but I’m happy with the result.
After I had that done and rendered out it was time to start the paint over. Initially I covered over the 3D blockout entirely but painting each of those trees was taking some time, and if I were to replicate the angles/orientation of each tree then I’d have to paint them individually. Thanks Katie.
Not sold on Pink either… and I freaking hate that rock!!
Week 6 :
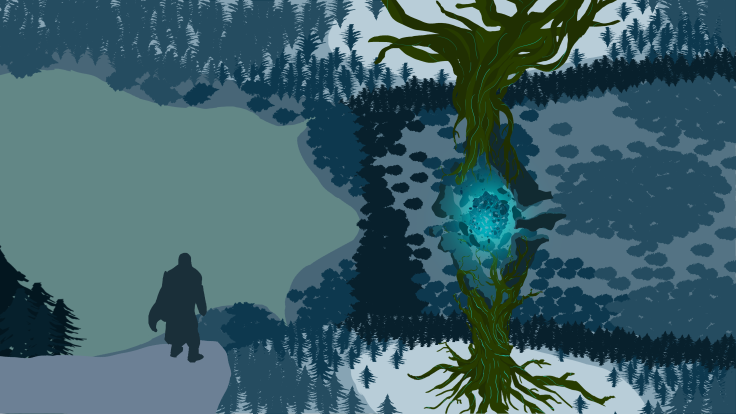
After Years of redrawing and concepting I finally had a rock that worked more or less for the base. Katie helped create a super dynamic Blizzard around the Crystal which looks so awesome and is just absolutely perfect I had to keep it!
Week 7 :
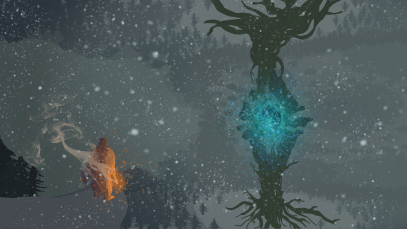
Finally the whole thing is done! I’ve painted over the character and fixed the rock, I touched up the Lake and the River, added some blue lighting to the blizzard and washed out the roots a bit.
It’s not perfect but I think it’s pretty damn good, given more time I’d paint over the crystal again to give more detail and less pixely and redo the lake and river again to give them more texture and add snow around the scene.
Snow Effect tutorial:
Title Effect tutorial:
Just a helpful little resource I used as a refresher when working between the two programs:
In After Effects using Red Giant’s Particular plug-in I created a basic Snow system and the title effect which I think looks awesome however needs some work.
A different font for sure, I want a slight change to the snow, obviously the smoke isn’t moving at all so that kinda ruins it, and the crystal needs some life so perhaps some bobbing and light pulsing.
Smoke Effect tutorial:
Downloaded an awesome font from dafont.com which works soooo much better, using a tutorial I created the smoke effect and I added a CC Light Rays effect over the crystal. I also played around with the snow parameters quite a bit to change a few extremely minor issues that probably only I would notice buuttt I’m probably the only one that will really have to look at this afterwards so y’know.
I kind of underestimated how difficult it is to composition a shot, Honestly writing this now I still don’t really know. So what does Cam do when he doesn’t know something? He Lear…..Sssteals it… or well borrows it for study purposes with no intent on publishing it or making any profit whilst openly admitting to doing so, by the way “Student Work” bam! no copyright strikes for me.
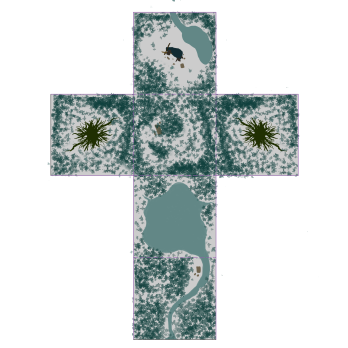
So the on on the Right is literally just the same as the shot I deconstructed, the left is some nightmare I threw together myself.
Friday:
of course after uploading the files to google drive that morning they were nowhere to be found sooooo I learned a bit about color things but I had nothing to put into practice and store that information so it’s all gone, so ahhh yeah thats awesome…
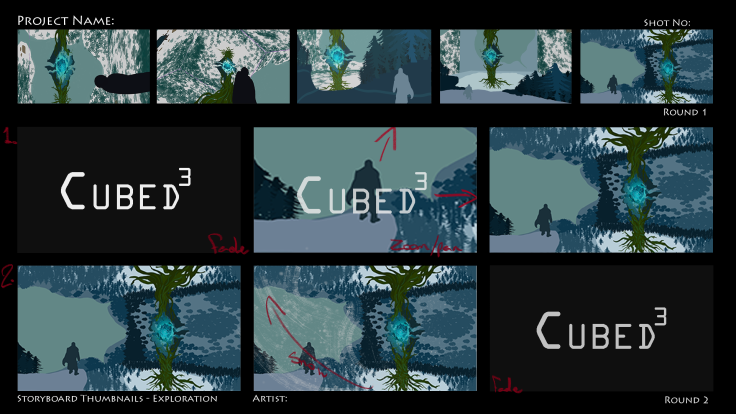
So I went to work doing thumbnails.
So these two took up all of the practical time for the class and I think theyre much better than my previous ones, but I wasn’t happy so I stayed behind after class because I knew I’d get nothing done. I went out and got a drink from the bubbler, and there’s a sign advertising the Pandora, whatever that is, and It gave me a lot of inspiration and I came up with this:
Finally a shot I’m happy with!! I only have one issue, I had intended him to be on the ground floor, but it looks like he’s on a rock jutting out from the wall behind him, so I could either Change the foreground trees to go horizontal or have him stand on a big horizontal log, for now I’ll leave it, I got things to do. I had a few ideas for storyboards whilst I was making this.
Saturday:
I made two different Storyboard sequences for this shot, which I elaborate on in my shot deconstruction which I spent most of the day doing. I for some reason struggled with that, I feel like I missed the memo, I didn’t really get why we did it let a lot what I had to do so I did something and there’s no doubt in my mind I’ll have to go back and change it but what ever I’m a bit of a dumbass so y’know doesn’t really bother me, I need to clock up more hours anyway.
(Insert link here)
Saturday I did a lot of boring admin work, I touched up my project plan/gantt chart tiny things which I was genuinely surprised she put down at all really, but fair enough, at least it’s feedback at all so I do appreciate that. I also wrote out this weeks and last weeks Blogs, and failed at remembering the past two weeks.
Time to start colours
This is pretty basic but it’s nice to visualise different terminology
Upside down is a Sci-Fi Fantasy Romance released in 2012, Characters Adam and Eden fell in love as teens despite the fact that they live on twinned worlds with gravities that pull in opposite directions. In this shot Adam is preparing to face his boss, This shot establishes where Adam fits in the hierarchy of power, he is dirt. Looking up at the building looming over him gives us a sense of scale.
Composition:
(Blender Guru, 2014)
(Division05, 2014)
Rule of thirds:
The shot follows the rule of thirds quite closely, Adam’s head is placed in the top right focal point, the building makes up the middle third and the city on the outer two.
The shot is heavily comprised within the vertical thirds, the tower taking up the centre third and the city filling in the outer two. On top of that Adam is placed heavily along the Right third line with his head in the top right focal point, perfectly displaying Blender Guru’s statement of not becoming a slave to the rules
Golden Ratio:
The city in this shot, and the majority of it’s lighting follows the golden ratio, this is very apparent on the right half of the image where the lighting on the buildings almost perfectly match the arc of the ratio. Again this doesn’t follow it perfectly but you don’t want to, the lighting on the left actually follows a tether/support cable which roughly follows the ratio “Don’t be a slave to the rules.”
When you compare it to the rule of thirds you can see it’s focusing into/around the top right focal point in this case that being the computer chip looking building. This is kind of obvious when you think of it as the rule of thirds ties into the Golden Ratio.
Pyramid Rule:
The Pyramid Composition Rule is often and effectively used for characters starting at the bottom with a base and working up to the head, it’s commonly used in comics eg. Superman to give him a towering stature. It’s not limited to characters however it is also used for environments, although it may be a little more difficult.
I’m not sure that all these triangles represent the Pyramid composition very well or if they are more to do with perspective however the thinking and reasoning still stands. The tower is the main pyramid in this shot and like the use of pyramids in Superman’s case the Tower benefits from having a towering stature.
Storyboard / Thumbnails
Finally I have a composition I’m happy with! Keep in mind the neither the colors nor lighting have been implemented I just find it extremely difficult to work in grey scale.
This shot established the characters goal, one look and you can tell the character is headed there, I wanted to capture that feeling and the scale from the study and implement that into my shot.
I tried following the Rule of thirds and the golden ratio but also not to become a slave to it. I placed the Crystal on and had it follow the Right third line, it naturally put itself into segments. The structure of the cube follows the rule of thirds as well, the ‘Top’ surface completely falls above the Top third and the same goes for the ‘Bottom’ Surface. I overlayed the golden ratio and had it spiral into the character, specifically their hand as I know when I experiment with colours and lighting I want to have at least one version at night and have them holding a red flare to counter the blue glow of the crystal.
I ended up coming up with two different versions for the storyboards, in version one the Title is the first thing you see then it fades out to a medium shot of the character then it Zooms/ / Pans out to reveal the whole shot then cuts to black.
In the second version there’ll be some kind of quick transition to the full shot, hold for a bit, then a gust of wind and snow will blow up around the character then transition to the Title, perhaps the title will form out of the snow whilst the shot fades to dark grey.
so i basically just continued but it clocked over to Monday morning so I’m putting it in here but i finished more or less the center crystal.
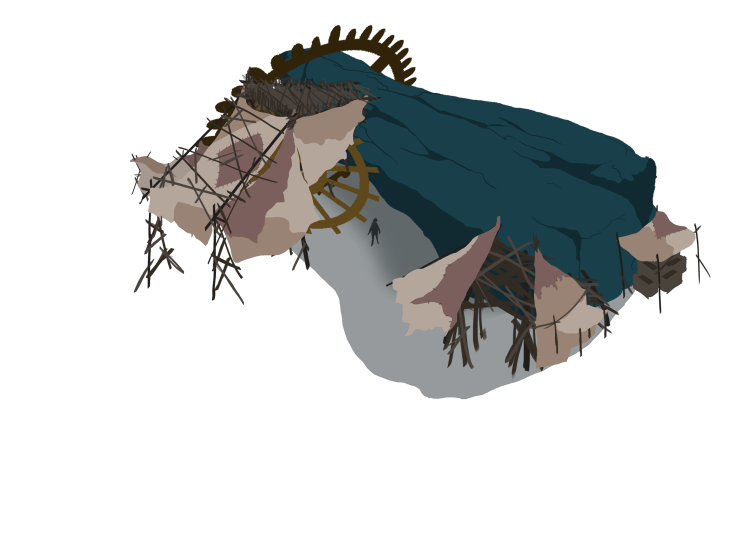
After I had finished the Center crystal which took me foooreeevver I was just glad to not deal with the crystal anymore really. I probably then and ate a kebab watched youtube and slept all day before getting back to it focusing on shelters. I put myself in the characters shoes and I thought that I would always keep the most important things with me but I couldn’t really spread myself over the 6 sides and that’s where the idea for a main base of operations came from. It’s really just a man-cave in retrospect but whatever it’s still awesome. The concept for it is that one of the huge rocks fell out of the Crystals orbit and when it hit the ground it broke some large machinery, jamming itself in the cogs and the character came and reinforced it and built a home out of it.
After class I went an put on some cloth and fabric on it, not sold on the colours at the moment… looks more like skin than cloth… maybe it is?


")