Spoiler warning! : all the writing in this blog is basically me ranting and giving myself a pep talk (Sorry not sorry)
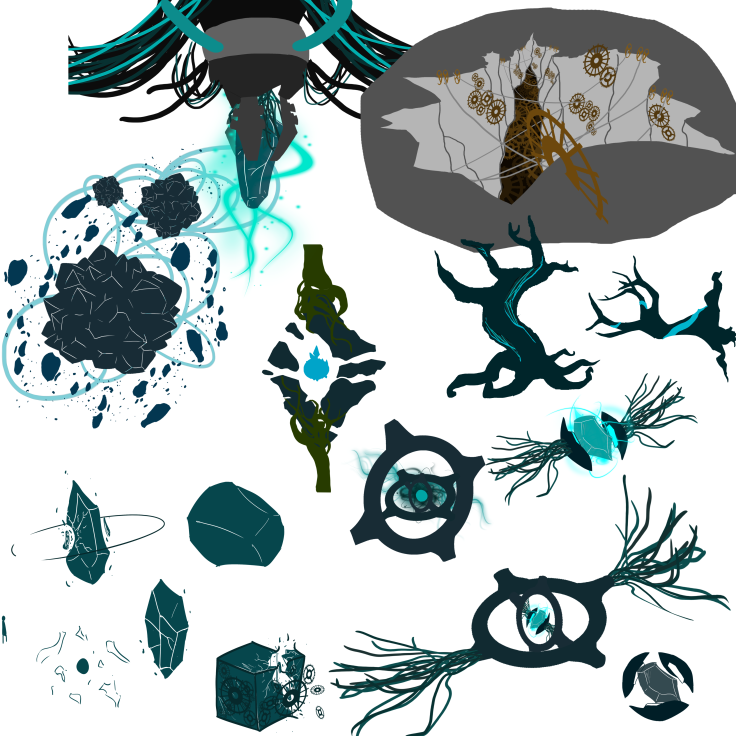
In class on Tuesday we began working on Concepts and gave each other feedback. I personally freaking loved this, generally we don’t get much insight into what anyone else in the class is doing and seeing theirs and talking with the class as a whole really gave me some great inspiration and from here until Friday my life revolved around trying to find the crystal center piece, which I personally believe to be the most important part. It is the subject, it’s what powers the entire world and creates/modifies the physics of the cube. As I progressed going design to design the complexity of my ‘Silhouettes’ also progressed, don’t get me wrong I love them all to bits and I think that the extra mile really paid off however instead of blasting out a bunch and working with more ‘disposable’ pieces I’d spend half an hour on one and become more attached.
“Kill your darlings.” -Craig, 2017
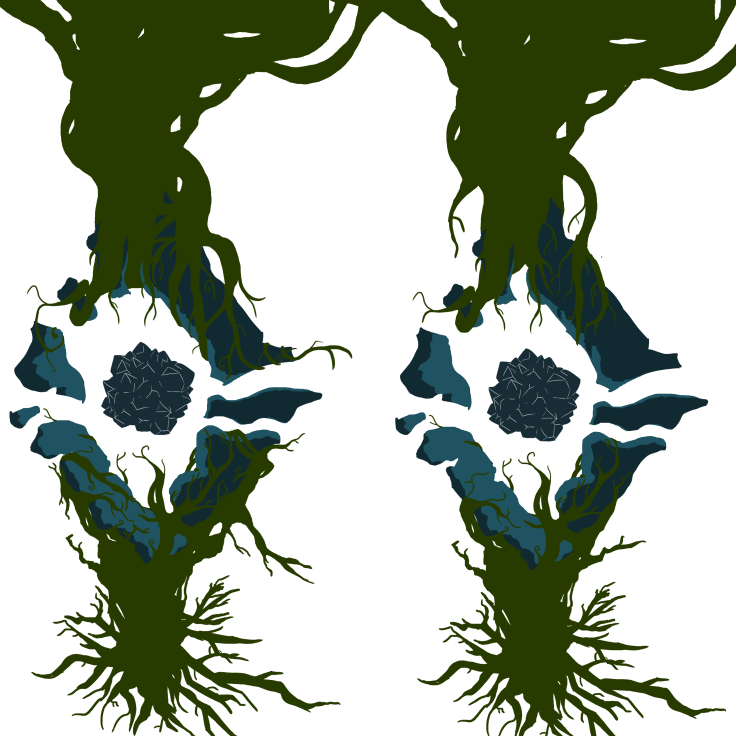
Thursday came and I had burnt myself out on the center crystal and I gave myself a break from it and worked on a few trees which I didn’t get quite right, I like the concept way more than the results I got. I also worked on something I never though I would have thought of, each side of the cube will have One distinguishing landmark, I’ve locked in that a frozen lake will be one, another might be a huge ancient/machine tree, I like the idea of a mountain but I don’t think it’d work inside the cube so I went the other way and thought of a ravine.
By the time Friday’s class came around I was super exited to get feedback on my array of crystals, I had a few that I really liked and I wanted feedback across the board to see what everyone thought about the different things I tried, what worked, what didn’t, what they thought about the ravine so that I could apply that feedback to the entirety of the cube. (And I still kind of want it but it’s probably a bit late I assume I’ve zoomed ahead of this stage by class next week)
Honestly I wasn’t ready for the way class worked on Friday I was expecting a similar sorta thing to Tuesday but the class sorta took a glance at all the concepts and chose one of my throwaway studies and went ham on it, don’t get me wrong I really appreciated it but at the time all I really gained was how I could improve upon that one thing, well still that’s mostly what I got, and that’s not Katie’s or anyone in the class’s fault that’s just my brain being my brain, when things are said to me if I retain that information is rare in itself, however I’m quite passionate about this so I soak it up like a sponge. My problem is I’ll say I understand something or agree with someone but I really have no clue what’s happening. If anyone is reading this at all, even if it’s myself here’s a pro tip on Cam, If you’re unclear if I understand something get me to explain it back to you, I’ll probably use an analogy and say what you said completely differently but if I can articulate it back to you, you know I’ve grasped it.
I was kinda pissed off and confused until I sat down at home after class and I began laughing like stfu Cam, sure they didn’t give you what you wanted, does anyone ever? but they gave you so much on something different something I wasn’t expecting, isn’t that interesting, couldn’t that be fun?
So now that you’ve vented and had a little pout, what’re you gonna do?
I’m gonna watch the best of BGT, listen to some weird shit on spotify and give them more than what they bargained for
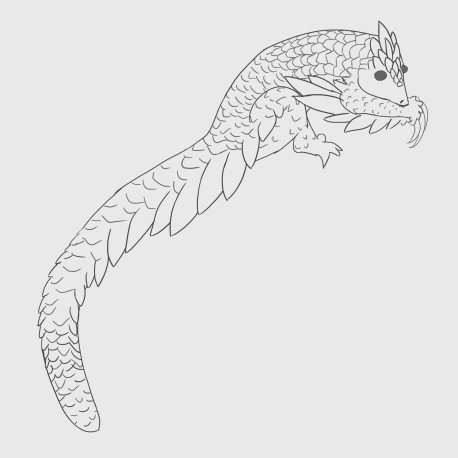
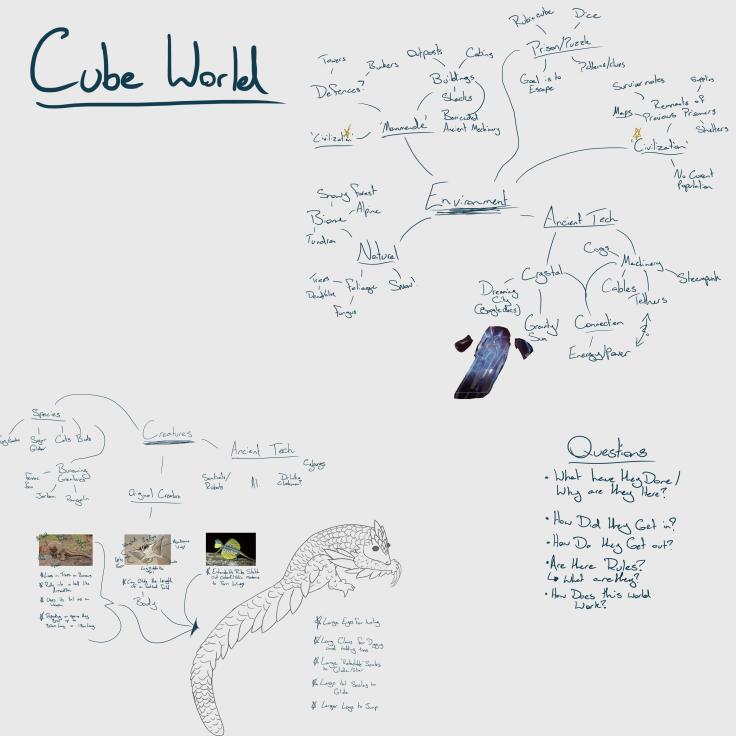
I’ve been working on a brainstorm for my world building project, and I sort of got sucked into some seriously unimportant parts of it… I’ve spent the last 3 hours researching and designing a concept for an original species to inhabit the cube world. At least it turned out fairly cool looking.
I also Recorded some game play of Destiny 2 checking out the material/Shader of a Crystal for reference: Really good bit at 1:15!
My final Brainstorm:
Wednesday:
I curated a few Pinterest boards to create the general mood I’m aiming for, looking at settings, textures, composition etc.
Friday-Sunday:
Again I curated more Pinterest boards to explore each (or at least a few) individual elements of the world
So obviously I did the acting/Improvisation, I also contributed to the initial concept and research and also all the graphics and VFX. The project was in collaboration with two Audio students who created the background music and sound effects, they also optimised the audio of the footage.
To successfully coordinate between the disciplines we set up a Facebook group and a google drive, during the concept/ pre-production stage we delegated roles, Elle was the director and research lead, Jen was Film crew and Initial Editor, I was Actor and Editor, Tinasha and Mitch were the Audio crew.
For the most part our team worked very well together, Elle, Jen and I have worked on multiple projects together in the past so we already knew our strengths and weaknesses and how to work well together.
The Audio students weren’t very helpful considering, they frequently missed meetings and lacked in communication. What held us back the most however was our pre-production stage, we went through multiple ideas and tried to make some of them work. This was around the time I began to research scope and got some advice from Craig, Don’t beat a dead horse, Don’t waste your time doing something that you really already know won’t work. Kill your darlings.
If I were to redo this project I wouldn’t waste so much time trying to recover something that was doomed to fail, I would drop it and move on. I would also liked to have filmed a little earlier in the tri so we had more time to edit, also I’d either extend it out to 10 minutes or shorten it down to under 5, 8 minutes is a weird length.
Honestly I didn’t learn much about the workflow for the Audio students, they hardly communicated let alone showed up.
This cross-disc project was interesting to say the least, the group kept changing leads and communication was extremely poor, so I ended up avoiding the group and essentially worked for Tina which I believe worked quite well, I never ended up meeting them once but we had a few brief conversations over slack.
My contribution to the project included, redoing the storyboards, creating a shot and asset list, a bunch of assets and the majority of the basic animation. The film students made a film and took our animation and sprinkled it through the film.
As I mentioned I didn’t deal with the film students very much, I mainly communicated with Tina, we used Facebook to talk and organised files through Google Docs, we also used a Google spread sheet to organize assets and shots.
My ability to objectively scope down an outrageously over-scoped project from 40+ shots of complex animation to 9 shots of basic animation. I personally would have liked to have done more however I had to prioritize both my and Tina’s specialization projects which were suffering.
The film students were a bit of a mess, I had to redo a majority of the files they had provided so that it made sense, they kept changing leads and throwing out all these differing opinions. Tina really struggled this tri, she didn’t want to let these people down and tried to counteract me by scoping up things that she was working on, which I then convinced her not to, the film students seemed fine with the level I had scoped down to.
Next time I probably wouldn’t take this project, it was a mess all around. However if I had to do it again I would smash it out and get it over and done with, it dragged on for way longer than it had to.
Again I learned nothing about the other disciplines, the conversations that I saw and heard through Tina was a mess.
This cross disc was a nightmare. I contacted Liam in week 1, I had worked with him previously and it went really well. However it seems I wasn’t the only one and he bit off more than he could chew. Elle and Jen and a few others also contacted him and did projects with him this tri. Even though I was the first one to contacted him. We communicated over Facebook and face to face a few times, we shared files through Google drive.
It was great that we got the ball rolling in week 1, I did all the concept work and sourced reference material for the both of us. I also kept scoping the project down as time went on, getting to the point where the project went from including a backing track, dialogue to just two very short lines of dialogue. Perhaps the only other thing that stood out is that he got something to me at all on Wednesday week 13.
Communication dwindled a bit, Liam bit off more than he could chew but also wouldn’t drop the project even after I asked him.
Next time I would really keep the communication up, be constantly talking and taking more of a lead on the project, and try to get things moving faster, put a deadline by mid tri and work with Liam more actively.
This is the only real work I’ve done with animating in 2D to any kind of standard, this wasn’t just my work however, (mini studio project). Looking back my work is almost laughable, I can do way better than that.
What I want to achieve
I want to achieve an adept understanding of After Effects, 2D Rigging and Lip Syncing, I will achieve this by creating a body of test pieces and hopefully a final product however the final product is secondary to the tests.
Mood:
I first came up with the concept for this project by doing this:
Listening to this:
Whilst watching this in mute:
This is what I’m aiming for in sense of mood.
Style:
The idea of characters being defined by colour
To constantly have very interesting camera angles and effects similar to this is something I want to replicate for this project (Such as the vertigo effect 3:38).
What do I need to learn?
I want to overall sharpen all areas of my 2D animation skills as aside from briefly touching on it early on in the course I haven’t had much opportunity to play around with it, making me feel as though it’s too early to rule out 2D.
I will be living in After Effects, specific Duik. I want to learn 2D rigging, character and facial hopefully being able to make a lip syncing rig thing in there too. I want to learn the generally how to use the program so I’ll be making a bunch of different test pieces and effects.
Elevator Pitch
I will be creating a body of test pieces to learn the ins and outs of AE, through my test pieces I’d like to create a 2D proof of concept short for a story about a Guy suffering from repetitive memory loss. Focusing on Lip syncing, 2D Rigging and compositing.
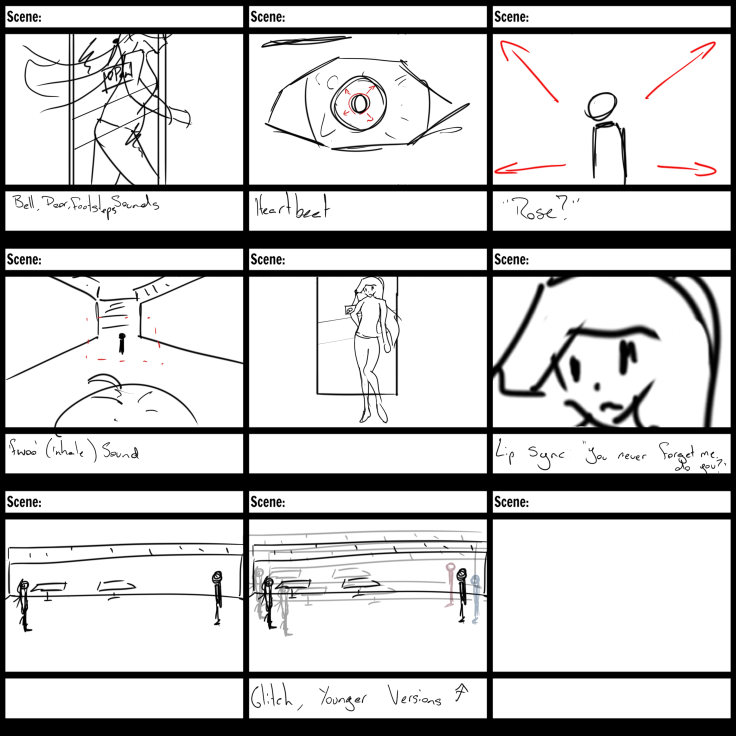
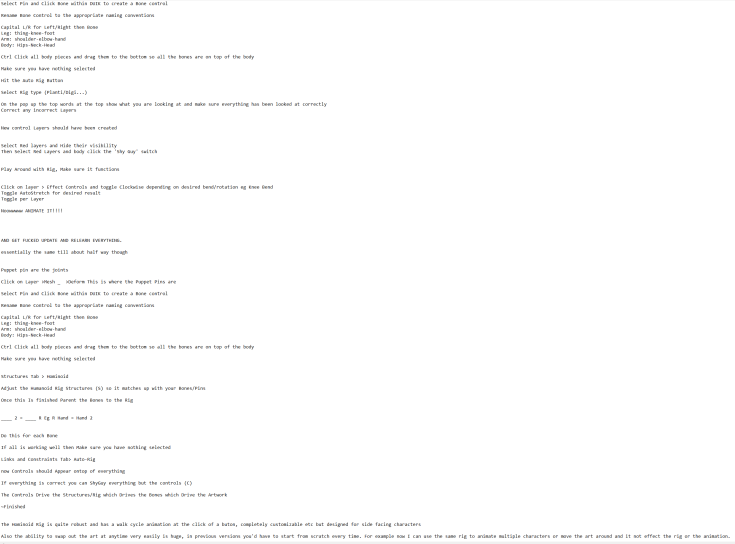
So for this Part, I want to create my final piece, at this point my cross disc audio guy won’t come through in time so I’m going to create something better!!! AN UBER RIG! Cramming in as much as I can into one awesome rig! thanks Chris for the idea! I’ll note my workflow and techniques etc as I go.
First I have to do all the art, however since this is have way through the due week i dont have time and since it’s a student piece copyright doesn’t exist, im not claiming its mine or trying to monitize it so time for some heavy referencing from Jaiden Animations! I basically just took some snippits from this and pieced it together.
Now the art is done it’s time to see if my idea of combining everything I’ve learned will be freakin awesome or break AE…
I’m going to make a bunch of Sliders, one for the mouths, one for the Eyes and One for each hand. Looking back on this Tutorial and my notes from last week.
Now that all my sliders have been set up it’s time for the moment of truth, can I hook up sliders into a duik rig? for now I’ll be using the ‘potato rig’ tutorial method, just basic pins and auto rigging. please work!!!
I followed through with this plan first doing a small test arm rig. to my delight it worked, I could connect everything up and the hand slider functions as intended! So I scrapped the arm rig and went full steam ahead with the full thing… I forgot to test how well it moves…
My first attempt at this was okay, it did the main things, however the wrists whenever I moved the arms, would float away and so would the face… and yeah, people don’t typically do that to my knowledge… And from what I’ve learned from my time with Duik is that it’s faster and easier if somethings not right, is to start the rig from scratch.
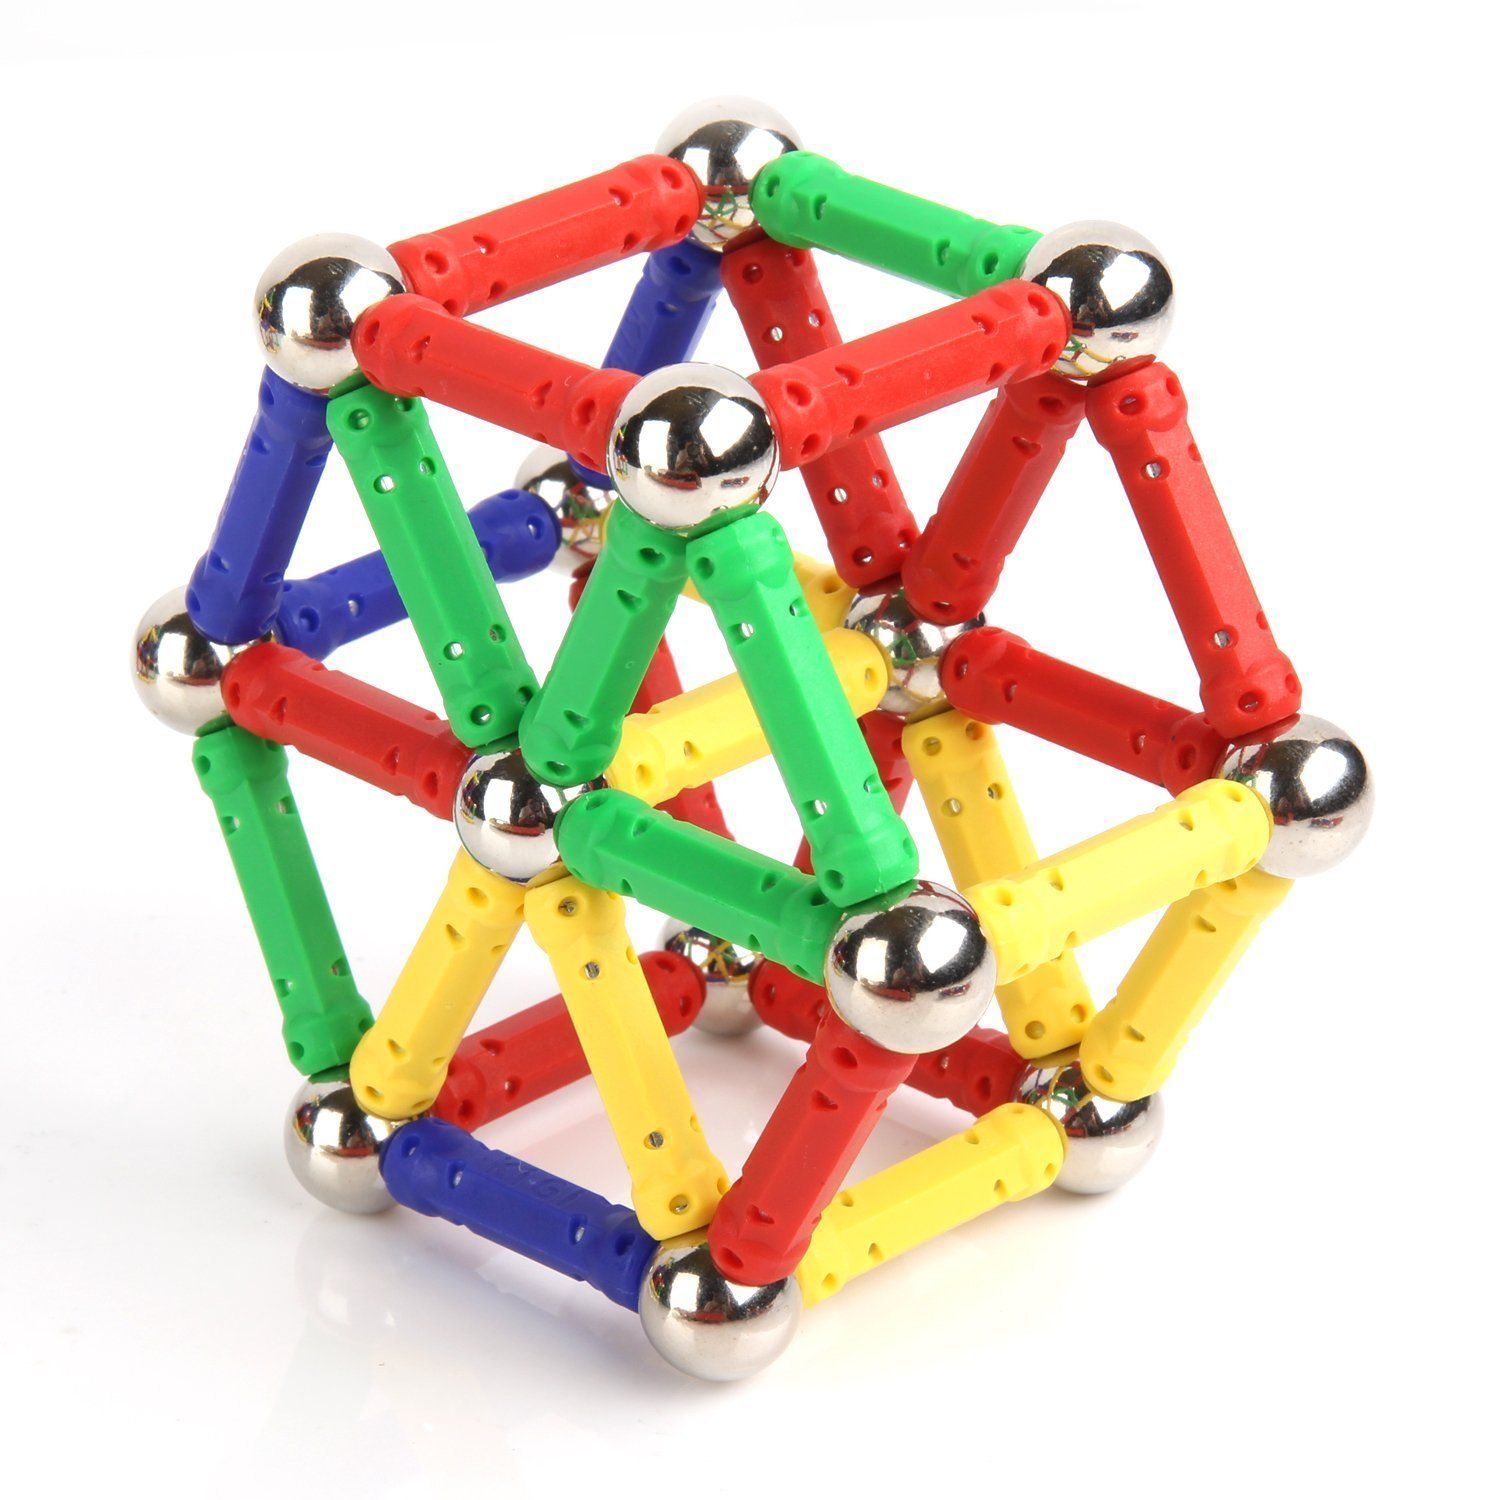
I went through each stage step by step, however if you change nothing then nothing will change right? And Duik’s bones are kinda like those magnet building toys that I used to have, each bone being a magnetic ball and each art piece a stick, the auto-rig just puts them together. So yeah pro tip, want a stronger rig? Add more magnets.
I learned a pretty good little thingy during my second attempt that is you can make place holder bones that other bones can link to to essentially fuse separate art pieces together, though this may cause other issues, it still does it.
So round two is a great big whopping success, it’s got it’s kinks, like a bit of a snappy wrist but I’d say it’s damn good and I’m just over the moon with it. As a proof of concept I believe it’s amazing, you could go more in detail and have each eye and each eyebrow as independent sliders, have hands that like to stay on the body a little more than they currently do, go in and customize the settings on how the arms and legs move because they’re currently a little off, do a better job on the half functional artwork and a bunch more to improve it.
What’s really great this rig, is that it’s basically a Mr Potato Head, I’ve set the rig up so that I can retroactively add new art in, say I need to animate the rig doing the peace sign, just draw the hand, chuck it into the said hand comp and bam done! Wanna upgrade to separate eyes and eyebrows, detach the current eyes and slap on the new ones on! Just Plug and Play!
(More and more apparent that I’m just a kid playing with a new toy)
To show just how easy this plug and play rig is I did a quick little animation, admittedly it’s not good at all but it serves it’s purpose.
You may have already gotten this impression but there’s a few issues with the arms, the arms are by far the most complex part in my opinion, sausages with sausages with sausages for fingers that are meant to do stuff.
In the future I have plans to implement the principle of the head turning rig and try to apply it to the whole body, one controller changing the way he’s looking obviously but also the way his body’s facing, that would be incredibly powerful. I’d also just in general love to add a huge amount of sliders to the rig, body types, facial features, hairstyles, I’m not sure if clothes would be possible but that would be interesting.
Gigantic. (2017). Character Rigging, EASY Character Animation Tutorial In After Effects, Illustrator And Duik Plugin [Video]. Retrieved from https://www.youtube.com/watch?v=IJgAUkjsomA
In Love With A Ghost. (2017). we’ve never met but can we have a coffee or something (20mn extended) [Video]. Retrieved from https://youtu.be/BeI6an1Fy6E
Now I admit I’ve been really slack with this over the last few weeks… And I probably won’t remember much from the past few weeks but hey, I’ll do my best!
WEEK 9 – God damn was this really that long ago?!
I’m assuming this is the week I joined Tina’s Cross-disc group
During this week I played with Dolly Zooms or the Vertigo effect which is when the camera is physically moving one way and zooming in the opposite, in effect keeping the subject relatively unchanged but warping the surroundings/background.
I attempted to recreate this in After Effects, however, using 2D images didn’t really yield any results. I’m yet to go back and attempt to replicate the effect my force but moving a camera through 2.5D does not do much for it as is.
After not really liking the vertigo effect too much I ended up just playing with the camera and 3d objects to make a 2.5d scene
Week 10 – I don’t remember much
I decrypted what we were given from the rest of the cross-disc group and I basically said Nope. Nope, Nope Nope! So I ground it down into as minimal as I could really do with Tina constantly trying to the opposite and make it more difficult. Originally it had around 60 shots of full animation and I brought it down to 9ish. I wrote out a shot list, redid Tina’s Asset list and remade the storyboards.
As far as specialization goes I wanted to try some animation and work more with the Duik Rigs, It’s not good at all but it’s a thing. As far as complexity for this Rigs go this is by bar the most complex and Functional I’ve made in Duik 16 even though the Left arm is completely broken. I’m still trying to figure out how to make the head work decently. So after this tragity, I’ve reverted back to Duik 15 and will retry rigging in that sooner or later.
WEEK 11 – This week…
Tina sent me a link on a new method for doing a 2D head turn! so yknow it’s a thing
Cross Disc: I’ve finished all my assets and begun animation, they won’t give us the audio so I can only do what I can do with that… At this point I really don’t care enough I have more important stuff to be using my time doing, Tina’s I’m really not sure what she’s doing because now I’m stuck doing all of the animation, she’s making Rigs even though I told her not to as there’s no need at all.
I finally got a hold of Liam for the first time since week 2 about what’s happening, so essentially what he’s been doing is working with Elle and Jen who just saying spoke to him weeks after he was working with me, and he has music tracks demos plugins and all that for them and he said that after he’s done with them He’ll work with me. I was like drop everything for mine I just need the Dialogue so I can actually work on that stuff and He’s gonna get that to me who knows when I really personally doubt it though and then If he does I’m pretty sure It’ll be too late for me to do anything with it.
In anycase, it’s about time I should learn how to lip-sync at all, and I really enjoyed it!
I learned a lot and I realised I hadn’t been jotting much down for my tutorials and that I should probably do that. But I don’t really Enjoy typing much so I wrote lil sticky note books:
but yeah I still need to write them out afterwards so I’d better start
First I watched a tutorial on how to make a Lip Sync slider control, WHICH IS FREAKIN AMAZING!!!! anywho notes:
1- do art + import
2- select all then alt ]
>sequence layers
>click last layer and click N
>Trim comp to work area
TADA! now you’re all set! each layer should be 1 frame and the layers staggered
More notes like this is sorta pointless just watch the tutorial
Make sure slider value is = to the number of layers you have!
Right click on the ‘slider’ keyframe and select ‘toggle hold keyframe’ this is essentially stepped keyframes so remember this!!!
DO NOT add extra art in later and expect it to work Good!!! Make sure all art is done before you start!!!!
After this, I attempted to test out my new slider control and found a short clip from Dylan Moran. Considering I’ve never lip-synced before it does a good enough job.
I then read through Keith Lango’s tutorial on lip syncing
I finished Lip Syncing and Comparing the two the new version is a clear improvement, The first is still convincing enough but side by side you can really see it. the major difference between the two is once I’d broken it don I understood it and it was just way faster and easier, it took over an hour less than the first try. writing it out, listening, breaking it down and then blurring and exaggerating. It’s also just more fun, I’m now fluent in Monkey.
Number 1 is me winging it and number 2 is me after some research
My specialisation has morphed a bit into learning After Effects and becoming proficient with it, focusing on 2D rigging, Lip Syncing and other effects. Testing different aspects and learning the techniques in order to create specific shots that’ll hopefully turn into something coherent, if not I’ll have some decent test pieces for my portfolio.
This was the first tutorial I followed, before this my experience with After Effects was very limited. So it was generally good to learn how the program works as well as looking into how to use the camera tool and creating something really cool. the plug in that was featured in this is freaking awesome too. The other glitch tutorials were similar in the way that I refreshed myself with some of the basics, they weren’t as coherent and in depth as the video co-pilot.
As of this Week, I wanted to Try Tweeting progress updates more often:
Well, I have a long way to go before I’m proficient at using Twitter but It’s a huge step in the right direction.
I also posted a video to YouTube documenting a bit of my progress on the scene I was working on, unfortunately, I didn’t think of this before I’d started Rigging so I didn’t capture any of the drawing phases.
I created four separate Rigs in using Duik this week, The first was a little Potato looking guy from a tutorial that Tina showed me in class. The Next was one I tried using the same method at home but I’d drawn them myself, however, Duik had an Update so I had to teach myself all over again using a few tutorials. The third and fourth are the two characters in the final scene that I produced this week, They aren’t perfect I’m still trying to figure out how to Rig the heads properly but they work quite well for the most part and I now have the general workflow down pat. Along the way, I jotted down a few notes:
After I’d Rigged I followed a few more Glitch Tutorials as the previous one I’d done was quite complex, after this I compiled the whole thing and bam!
Now for some unknown reason, I’d decided to start working on the Last scene in the overall concept, first… I’m just weird like that. But yeah, That’s been my week.
What Have I Learned This Week?
I learned a lot this week and the majority of it was all to do with After Effects, I learned that getting Duik on the PCs at Uni is a bitch, but I also learned how to create and rig a simple humanoid character within two versions of Duik. I also learned a lot about the general program, what certain effects do, how to animate within it, a bunch of shortcuts, Shyguy, different modes etc.
I’ve finished this assignment at the point of me writing this … whoops.
In week 4 I modeled and Rigged my Jelly using the stretchy bone rig, the model turned out fairly well, except if I were to redo it I would delete the vertices inside of the model so that it wouldn’t cause any minor issues later on. The rig however worked perfectly for what I was trying to achieve.
I also created all of the proxy assets for my scene and animated the basic timing, finishing my first second iterations of Previs
Week 5 I revisited the topology of the waiter’s head and modeled eyes and a mustache on his head opposed to my original plans of texturing the face onto him.
I also rigged the waiter, after multiple failed attempts of rigging the waiter as a human because I really wanted the arms and feet to move, however after spending hours on it I figured I was wasting my time at that point as I am also doing 2D rigging in Spicialization project so I’ll meet the LO anyway, opting to use the stretchy bone rig for the waiter as well.
I followed a tutorial by Video Co-Pilot and created a glitch effect test piece for my Specialization Project, I think it turned out very well.
Week 6/7 I spent a majority of my time Texturing and Rendering with a side of typing up this and Post-Mortem, so there’s not too much to show for these two weeks other than the final piece.
What have I learned?
I learned allot to do with the Arnold render, lighting, textures/materials and Rigging stretchy bones and I learned allot though the After effects tutorial as I’ve not spent much time within that program.
I am very pleased with how my Jelly turned out for the majority of the animation, the stretchy bone Rig worked well to animate the squash and stretch for the wobble of the Jelly. Should I repeat this or ever animate Jelly again, I’d like to try animating it with two wobbles running along the two planes, for the animation I did I only animated it along the X/Y plane I’d like to see if I could add a secondary wobble on the Z/Y planes.
Considering I did the 2D Character in the last few hours of rendering out my animation I’m very happy with how it turned out, I had drawn like 5 different faces and expressions for him however cut it back to two in the final edit as I believe the rest were fairly unnecessary. I imitated Rick Murray’s 2D style from a few of his videos and assignments that I’ve worked with him on.
I’m quite pleased with how it turned out overall, small things such as using a mask on the 2D character for the Jelly, as the waiter dashes bringing him closer and ending the shot a bit sooner, and making the lights brighter would have just polished it off, however I’m still extremely happy with how it all turned out. Getting everything out of the way at the start was perhaps the key to my success.
Negative
Rigging was an interesting event in the pipeline. Originally I wanted to create a more complex rig for my waiter with arm and legs at least. But I realized that my waiter wasn’t the main character of the Animation like I originally thought. To avoid this in the future I’ll have to do more research and make more test rigs before attempting to rig, alternatively modifying a CAT rig so that I don’t have to make one from scratch.
Due to my original thought process that my waiter was the subject of the animation I put more effort into His model compared to the Jelly’s. This was generally fine and didn’t pose too many issues however while Rendering it was clear that the translucency on the Jelly couldn’t get through the multiple layers of polygons making the Jelly quite Dark and not as bright as id like it to have been, but that’s fine just change the flavor of the Jelly a little and it’s fine… In future all I’d have to do to avoid this is to delete the back polygons inside of the model.
Aside from my waiter having no way to move his feet as I’d liked too, Which is more to do with his Rigging than the animation itself, If I were to go back and redo it, in shot two I’d like to add some personality to his dash. At the moment he sorta zips across the screen like a robot. I could’ve avoided this even just by arching his back a little or giving him some simple squash and stretch.
Hypothetically, if your project was a large scale production, what production roles do you think it would require?
Project manager/Leader – Storyboard artist – 3D artist – Rigger/Skinner – Lighting artist – Animator – Texture/Material Specialist – Generalist?
Out of the roles you have listed, what production role was the most challenging in this production, and why?
Probably the Rigging, as I have had very little experience in this area and generally dislike it the most.
This project taught me allot, teaching me the basics of all the steps within the pipeline, specifically how to render using arnold, including Lighting, texturing and using the real time rendering thingy. I also learnt the value in scoping down projects and how to do that more effectively.