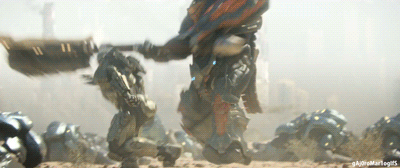
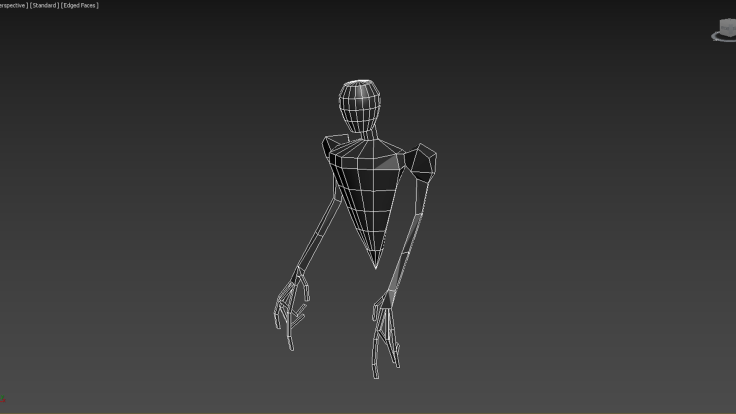
The character I will be animating running through the obstacle course is none other than the famous Super soldier John, Spartan 117, otherwise known as the Master Chief from the Halo franchise.
I am personally a huge fan of the Halo franchise so this will be a bit of a passion project for me.
Halo 3 Live Action:
Halo 4 Prometheans Attack:
Halo 5 Locke Hunting Chief:
Mash up: (3:10 Ghost scene, 1:45 Jump)
Making Of:
Halo 5 Mountain Run:
Halo Legends Running Scene:
Halo 4 Teaser Trailer:
After Doing some research it’s quite clear that due to the use of performance capture the Chief is animated in a way that just about any athlete in a heavy suit would move, so I could also use videos of parkour, free running etc as reference too. Watching the making of for Halo 4, they wanted to make sure he moved like a machine, like a tank with feet. However, when it comes to combat Spartans can move extremely fast, and the Chief has been recorded to run over 100 Miles Per Hour. So what I’ve learned is that essentially Master Chief’s movement changes based on situation.
Fast, Agile, Almost Preemptive
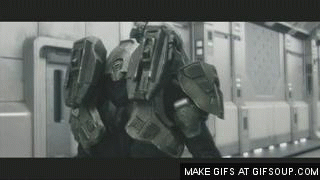
Slow, Heavy, Bulky, Purposeful
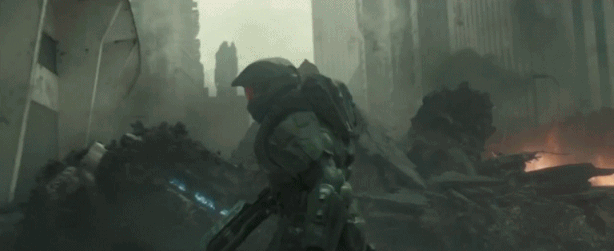
Perhaps one of the most unique thing about Chief’s movement other than his bulkiness is his thrusters and movements in low gravity.
This might come back to bite me by being so ambitious, but i would like to have at least one section of the obstacle course in low gravity, looking at Halo 4 and 5 for reference but in particular the Halo 4 Teaser. I’d also really like to have the Chief jump from somewhere and land like he did in Halo 2.
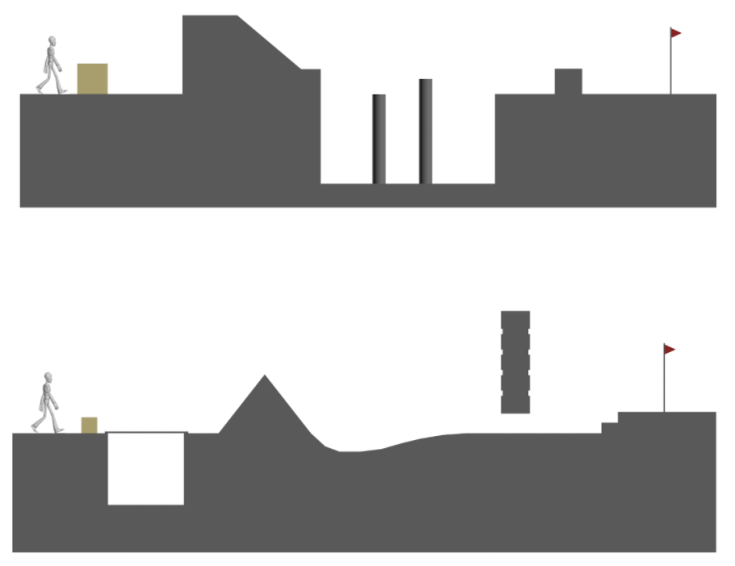
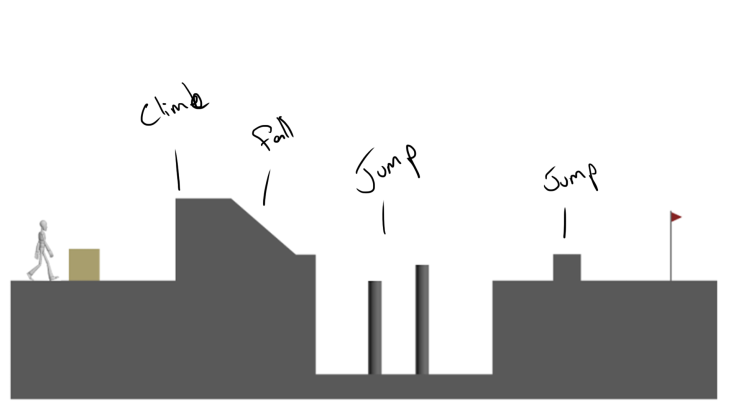
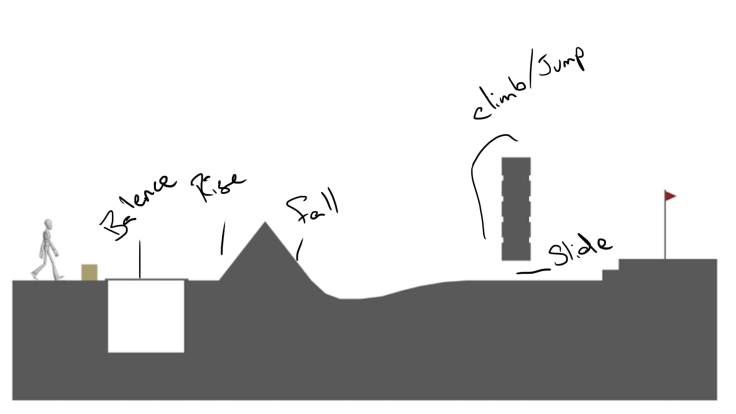
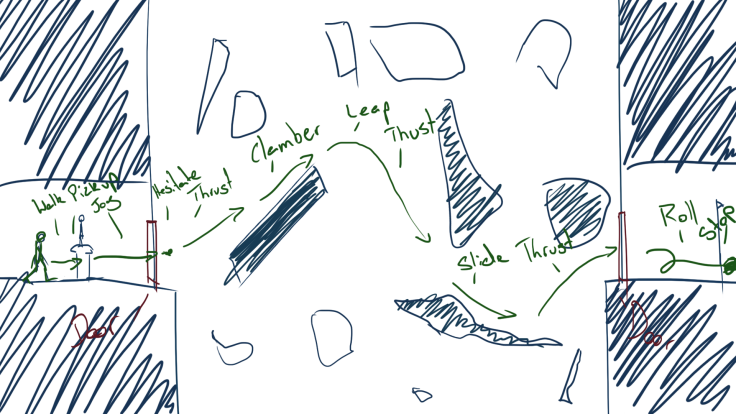
The Course
Instantly I realized how awkward it might feel having this super soldier running through all these tightly positioned obstacles so I believe stretching out the course a little may be beneficial, however another way to solve this is to simply slow it down a bit. I’d also like to mix and match a few of the obstacles from both courses.
First I’m going to analyse the courses for the basic movements within them and then I want to meet in the middle, then change the look a bit.
Concept for custom course:
Basic Pass of Key posses
If I could arrange for Steve to block out my course with just as basic geometry as the other two courses that would be a genuinely huge help, however I still have to check with him that this change is acceptable first.
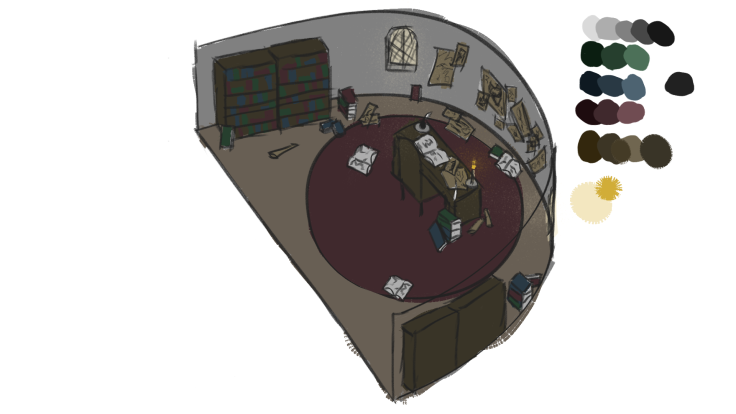
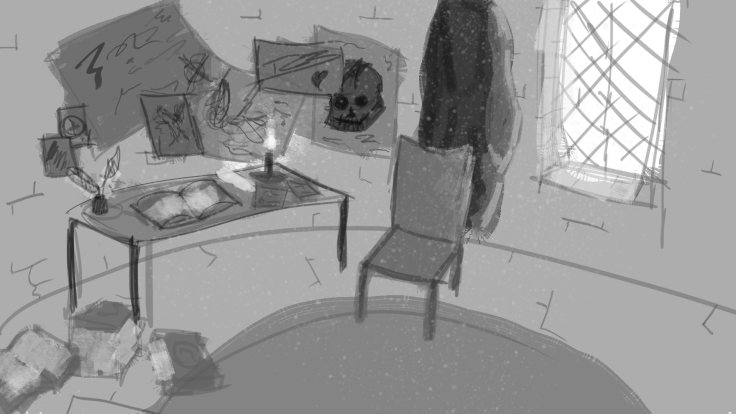
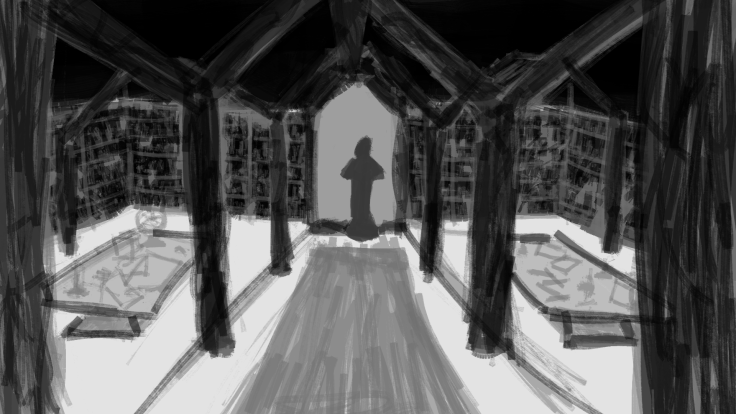
Monday I worked on concept art for my Specialization Project, designing a few of the rooms, specifically the Bar and the War-room.
I followed that up with designing the layouts for the Bar, War-room and the Library. I’ve decided that three rooms will be more than enough work for one trimester.
Wednesday I created a large portion of my assets for the Aftermath Project
Thursday I drafted up a Greybox and used a GameTextures Material Sample Pack from Gametextures.com
Saturday I worked on a concept art for Merlin, a character from my Personal Project, so I recorded myself drawing it over the course of three hours sped up 50 times.
What Have I Learned?
What Resources Have I Used?
GameTextures Material Sample Pack from Gametextures.com
From Monday through to Wednesday I worked on allot of concept art, which was so much fun.
Aftermath – Study room Concept art
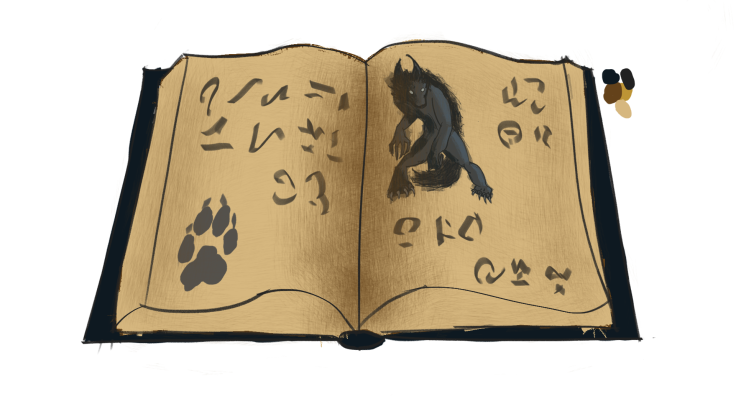
Aftermath – Werewolf study book
Aftermath – Inkwell
Aftermath – Study Desk POV Concept art
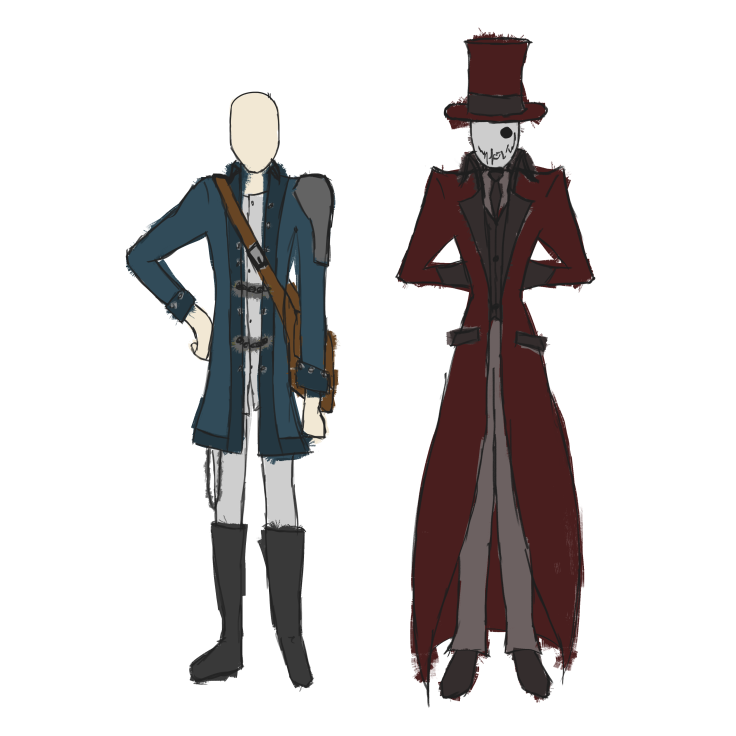
Personal – Character concepts and Ace redesign
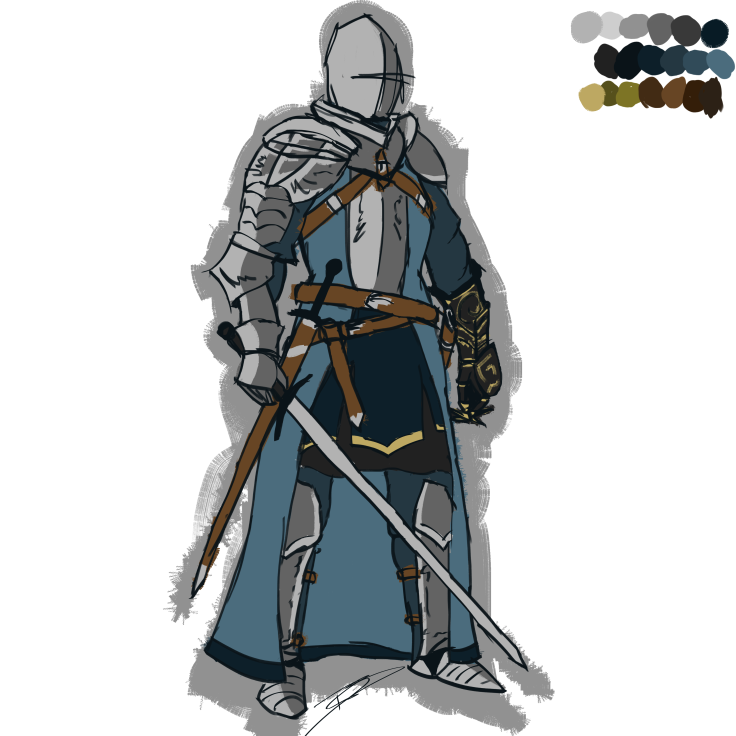
Personal – Knight concept art
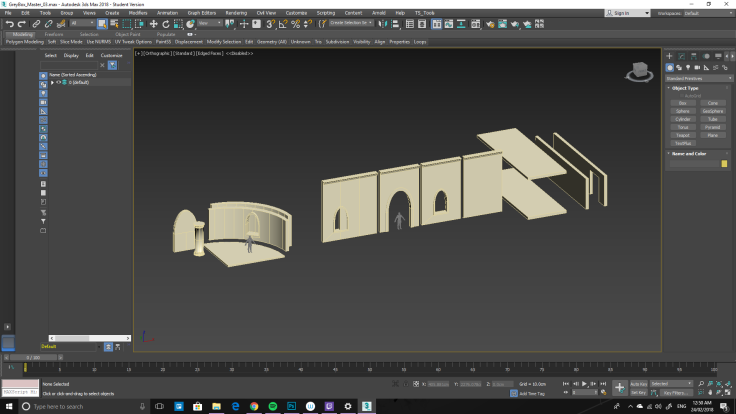
Aftermath – Modular Kit 1st Iteration
Aftermath – WIP Statue
What have I Learned?
I’ve learned how the iterative Greybox technique works
I attended an Unreal Engine demo and learned quite allot, my brain kind of turned to mush but I did absorb a bit. I learned how to use shaders to merge or blend rocks into the ground to remove the harsh border between the two.
Resources you have found
I used the concept resource from last week allot, and I also used a scaling guide so that everything in the 3D space and the Greybox feels right.
This week I was able to put allot of puzzle pieces together, I completely changed my direction with my specialization, I finished my Bootcamp project, we found out our groups and we got started.
What have I made this week?
Monday- I began to develop a few different characters for my personal body of work, each with different personality traits and experiences, however after reading them over a few times something was missing, none of them were even close to developed enough. I realized two of the characters, The General and Lancelot, could very well be the same character at different points in time. However If this new character were to be the main protagonist then there’s nothing really unique to them, so I mixed another character into the hybrid, The outcast/Half Demon, perfect! I rewrote the backstory accordingly and I was just so pleased, the character now had a traumatic experience and motivation, and while being at odds with the antagonist he was essentially in the same boat as him forcing more conflict to naturally arise.
Later on I wanted to attempt making a 3D model of a Demon, with the End goal of creating a semi transparent, oily looking texture and a Dark, smokey particle effect. I’d also like to animate it idly twitching around.
Tuesday- I completed my Bootcamp and recorded a walk through of the Map; there’s also an Exe file in the link below if you’d like to have a go at playing yourself.
Also on Tuesday is when I drew yet another Demon (I love these things) in a very dynamic pose reaching toward you, at some point I want to take it into Photoshop and polish it off like the last one but that’ll have to wait a little while.
Wednesday/Thursday- We found out our groups and got to work making concept art and different layout designs for our environment; ours being a castle or wizard’s tower.
Study room/Bedroom
Main hall/Library
Layout concepts
Friday- I scrapped my Specialization and restarted it and now I’m genuinely motivated to do it! My original idea was to create a 3D city based off my concept for my personal body of work, however I was equally motivated to change it to a fight scene, 3D character, or just about anything else, I wanted to do it all. However separating my Specialization from my personal work was extremely necessary, now I have no overlapping ideas. My new idea is still to create a 3D Environment, but it will be a literal Mind-map, an interpretation of my Mind, exploring major focuses and different Ideas I’ve had, this will come with the interesting challenge of turning the way in which I think, into a physical object; Metaphors could be a good work around.
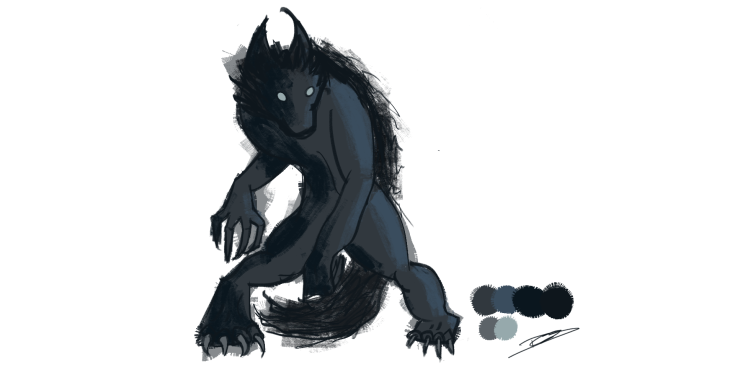
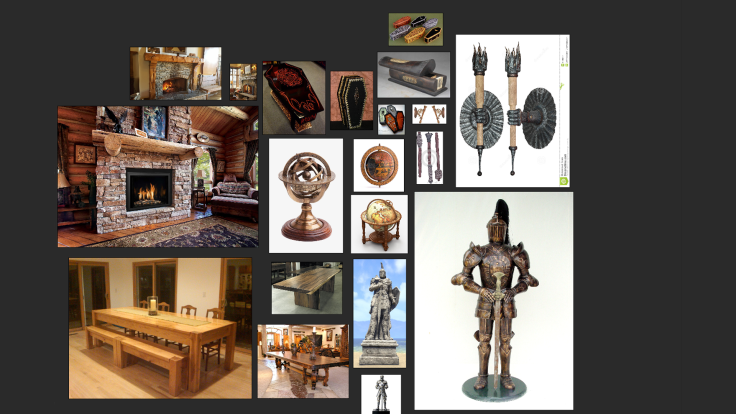
Saturday- I came up with a concept for our monster in the Aftermath Project, a Werewolf. I also gathered images together to reference for our Hero assets.
Sunday- I created a test room for my Specialization project, it took me a bit of math and a couple of tries to get it right but I got there in the end; after all the bigger the better right?
What have I learned this week?
I’ve learned a few new things this week but I mostly implemented the things that I learned last week and tried to become more efficient at them. I learned how to create and use VFX in Unreal Engine and how Lighting works. I also learned a new style of concept art that I’m really enjoying and how to use some new Brushes in Photoshop. Finally I learned the basics of Player Scale and World Dimensions.
Resources you have found or used
A new Photoshop brush set and art style I’d like to use for concept art
(Ling, 2013)
UE4: Guide to Player Scale
(WorldofLevelDesign, 2015)
Toggl Report
Link to report: https://drive.google.com/open?id=1wZb45oeFkI-CoIaCEgUZIahxdYN6ckyT
Link to Zip File of Executable,Packaged UE4 project: https://drive.google.com/open?id=1H4dxeWyPTsExAY4dILsnhspzGsz0gxIV
Video:
1:
I started by creating a modular Kit of assets in 3DS Max, then Imported them into Unreal Engine. I used the Quixel suite to quickly make some Standard Textures, such as Glass, Highly reflective Steel and Leather. Following the video Tute I textured the Tiles and the ceiling lights, Importing them as I went.
Then I assembled two separate Boxes, a Testing room and a Display room. However the testing room developed over time and I wanted to keep it so I bridged the two together and created an entirely new experience.
Originally this entire Level design was just a test to see what I could do with my limited knowledge, but I stuck with it and Polished it off, because I wanted to show others what I had done, and I was really happy with the result. I figured that’s what Bootcamp is all about, right?
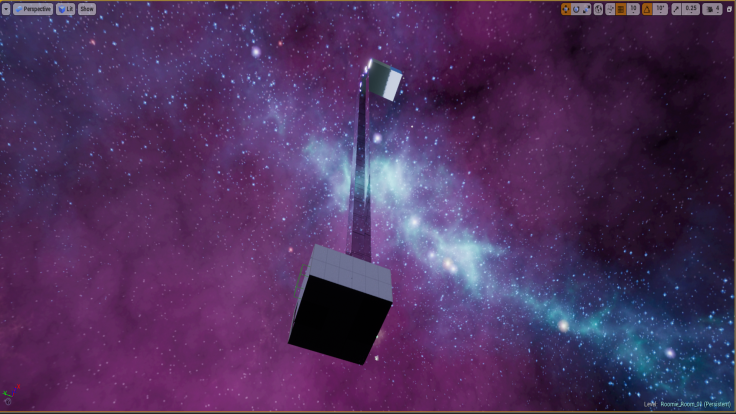
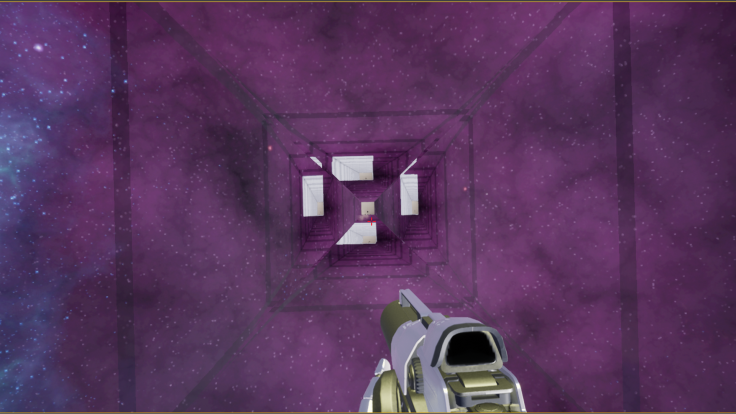
I found a program online that allows you to create a custom Space skybox called Spacescape, I used that to create the sky you see in the Image. Around this time was when I was having a go at setting up triggers, I wanted to turn the water in the shower off but I couldn’t figure out how to animate the particle effects. Unfortunate but I’ll learn that soon, so instead I set up a trigger for the player to knock over the statue on the shelf.
All in all I thought workflow was very enjoyable to work with due to how flexible it was, only having to create one asset and duplicating it, a simple tile can have a thousand different uses, simply swap and change the texture. Only made one wall? not a problem because very easily you can create an entire building. Sounds better than doing each one individually. After the Kit is complete, the rest is up to you, you could build an entire city, each building different with one Kit. There only really two cons I could even seriously consider which could both be easily avoided, that is repetition, if you did go ahead and make an entire city with on kit then I’m sure you’d get lost in it as although the buildings would be different, they’d still aesthetically look similar. My other issue is that you may tend to unconsciously start to build to a grid, and treat it a bit like Lego, however adding a few extra assets would solve that up in no time.
2:
Albedo, Metalness, Normal, Roughness and Emissive are the five most common Textures used to create Materials or shaders within Unreal Engine 4.
An Albedo Map is applied to a material to provide color, essentially painting it. A Metalness Map is applied to determine whether or not the material is made out of metal. A Normal map controls the way in which the polygon Normals respond to light, refracting it in different ways allows you to mimic chamfers, bevels or give the object some trim; and so on. A Roughness Map controls how reflective and glossy an object is, from Matte to a Mirror. Finally an Emissive Map controls the Material’s glow, the higher the intensity, the more glow the shader will Emit, however the glow effect it gives off is fake Light and will not apply to the environment around it.
Before I enrolled at SAE a friend of mine who studied here told me that if I was serious about animation then I’d have to survive the three studios, and now two years later I’m about to see just how serious I really am. I’ve taken the first step and I’m now one week through and I can now fully appreciate what he said, it’s all self-directed and everything has to come from me, there’s no strict guidelines anymore showing me where to go and what to do. It excites me because now I can finally do whatever I want, within reason.
After the first lesson I knew what I wanted to do, something that’s been slowing brewing in the back of my mind for about a year now. Over the year I’ve collected bits and pieces, different concepts for characters, environments, Civilizations, Races, Monsters etc! and I want to wrap them all up in a cohesive story world.
During the Mega Wednesday lesson we essentially did a workshop on Unreal Engine 4, learning the basics on how the controls work, handy shortcuts and such to prepare us for the Aftermath Bootcamp. Honestly I wasn’t thrilled about the idea of making a scrappy room to test us in turn taking away the time we could have had toward the Aftermath Project itself but it turned out to be extremely fun. I had originally planned to create a Wooden cabin on a floating Rock formation in the middle of space where the player can jump off of the deck of the cabin onto floating bits of wood and debris. Of course I scaled that back a bit as it was only Bootcamp and I have to get other things done, but I still wanted to give the player an experience, to tell a story because after all that’s half of what we do in the Aftermath project.
What have I made this week?
On Tuesday I wrote out a concept I had that I could use toward my Story World, it will act as a force of antagonism much the way the Zombies in The Walking Dead do. In a nutshell the land is plagued with Demons; ghastly apparitions that individually pose no real threat, however they can link together and once enough have linked together they will form a higher tier of Demon entirely. Read the full thing with this link! (Hopefully it works? If not it’s in my google drive)
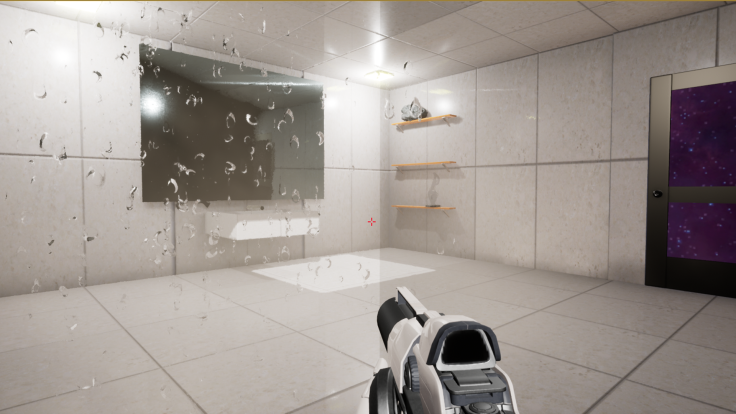
Wednesday through to Friday I’ve been working heavily on my Bootcamp Project! Before I mentioned that I wanted to tell a story or to create an experience, and I wondered if I was able to depict what falling unconscious in the shower might be like, perhaps you slipped and hit your head, or just dropped from exhaustion due to SAE giving you too many assignments. This idea came from someone in class making a comment that my tillable kit looked like a shower, and so I made it one.
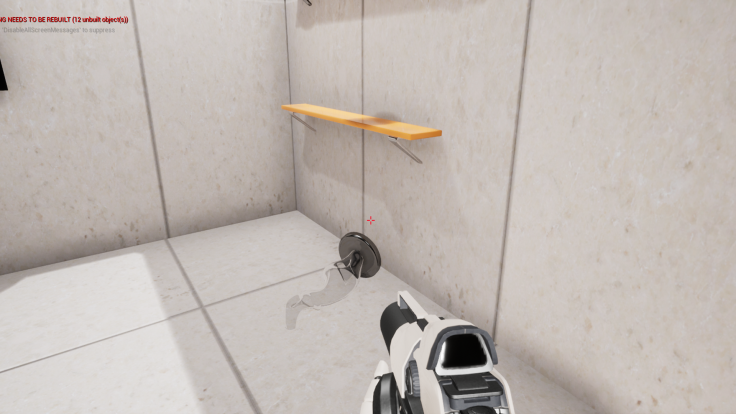
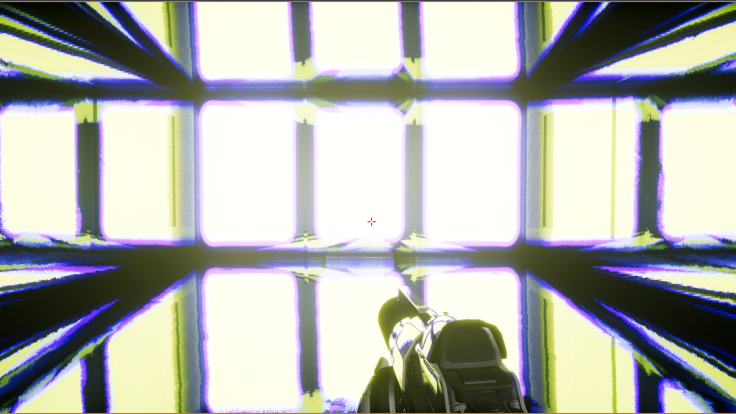
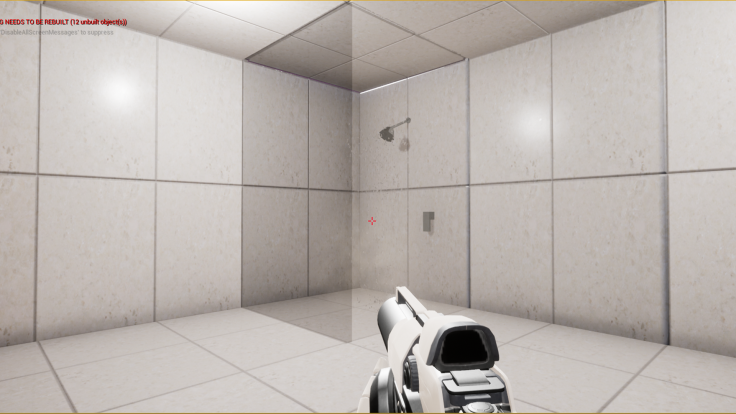
Early on I found out that Planes don’t make good floors, as you just fall right through them so I wanted to use that as a mechanic throughout the map. This is the first room that the Player spawns in; I used an extremely polished Steel variant and dialed back the roughness to zero covering the entire room with that material. I tried to replicate the effect that Mirror rooms have, with limited success. The glowing light is simply the material from my ceiling lights that I put on just to see how it looked, to my deLight the two effects create a sense that the player must walk into the light.
(GPI design, 2018)
Once the player walks through the light they fall down a long glass tube in the middle of space; a transition into the next room. I really only made this tube as i didn’t want the player to be able to walk back and forth between rooms, and I wanted to show off my custom Skybox. The Glass tube gave an unexpected effect, reminiscent to that of a kaleidoscope.
Again I made use of the Planes, it allows the Player to fall through into the Shower but if the player looks up all they see is the Tiled ceiling. I also played around with a few particle effects from the Soul:Cave pack; scaling down waterfalls to shower size was oddly satisfying.
I tried for quite some time to set up a trigger for the shower to turn off and on but to no avail as I was unable to animate the particle effect, perhaps next week I’ll figure out a way. However I did set up a trigger where if you get too close to the shelves you knock over the statue. I set it up in reverse but it looked extremely unnatural floating back up so I decided to get rid of that and leave it on the floor.
Friday – Saturday I took my Demon Concept and followed through with some concept art and designs. I when onto Artstation searching for some reference material and I found some great ones.
(Javora, 2015) (Eie, 2017)
(Gabriel Silva3, 2016)
Going into the Concept Art I knew a few features that I wanted the Demons to have, Long scraggly fingers, no facial features and some kind of shadowy smokey effect to show they aren’t physical.
After drawing the Second Concept I knew I preferred them without legs, and so I went on to change the proportions of the first one which is how the third and final was born.
I took the third design into Photoshop and searched for a smoke effect tutorial and I essentially created the effect by installing a brush set and combining the different brushes at different strengths.
What have I Leaned this week?
This week I’ve learned so much more than I was expecting to during the first week back like how annoying it is adjusting to the controls each time you switch between UE4 and Max.
Generally speaking a huge crash course on UE4 will teach you allot, how to set up materials and master materials as well as creating variants within them. How to animate within UE4 and how to create triggers to well… trigger said animations. I’ve learned how to create Tillable kits in max and import them into UE4 so I can use them over and over again. How to make and use Emissive maps along with how to texture and UV Unwrap in reverse. I’ve Learned what the heck NDO is for and the basics of it. Finally I’ve learned how to create a custom space Skybox in Spacescape an how to get it to work in UE4.
Additionally how to import brushes into Photoshop and how to use them to create smoke effects.
What Resources have I found or Used?
This week I mainly focused on smashing out my Bootcamp project, as such my resources will heavily reflect that.
Video Tutorials: https://drive.google.com/drive/folders/0B7-r4vIFJiECdzVHdUZyUGxnUzA
I’ve decided that for my specialization I essentially want to do a solo Aftermath project, to design and create a 3D environment
I have a habit of settling with a novice understanding of a program instead of trying to learn how to get better, that generally speaking goes for my art as well, I leave things looking sketchy and unfinished. With 3D all my experience comes from my time here at SAE, my understanding and skills are very basic but they are rapidly improving.
(McLean, 2016)
(McLean, 2016)
(McLean, 2017)
My goal for this trimester is to finish with an intractable, high quality environment from my Story world that I can post online for others to explore. I also want to develop a professional standard for my concept art.
(Yang, 2018)
(Goh, 2017)
(Rock, 2016)
I need to learn how to use what Photoshop, 3ds Max, UE4 and related programs have to offer. I want to learn the style and techniques of proper concept art, not to worry about detail but able to convey it, a professional roughness. I want to learn the pipeline of creating great 3D environments, everything from creating an effective Modular, Tillable kit and high quality textures to learning the ins and outs of designing and creating materials in UE4.
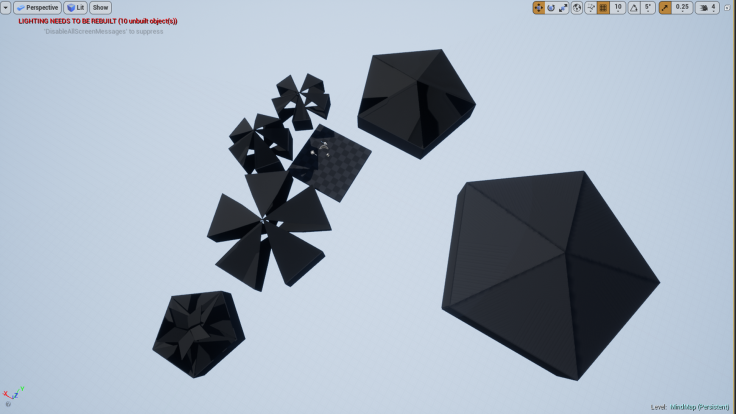
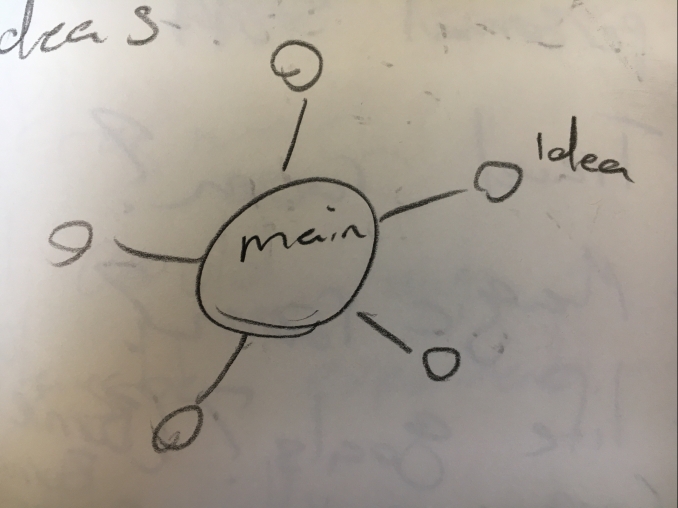
My new concept is to create and design an environment based around my thoughts and focuses. ‘The Mind-Map Project’ will consist of multiple small rooms that all converge into a larger hub which is where the Player will start from, being able to freely explore the other rooms in any order at their leisure. Each room will be tailored to a different aspect, idea or experience that I have had or been focusing on.
The Main Hub will be made out of modular Wedges or Slices, the only tricky part about this, is that I will have to predetermine the number of rooms that I will create so that I can make the angle of these wedges accordingly.
I would be able to overcome this issue by making it vertically modular as well, however an infinite number of rooms would be a bit more than I can chew. And so, due to my Research topics being: Polish and Lighting and presentation I believe the first concept with a limited amount of rooms will allow me to work on them more and develop them to a higher standard.
I’ve had multiple Ideas for the different rooms including rooms dedicated to: My personal project, the Aftermath Project, Inspirations/Goals, Travel and Magic, Nerdy/Gaming room, Nature, Standards, Library, A Playable experimental testing area and a few others. Begging the question How many rooms and what are the room themes? Another Question I need to find the answer to is What is the theme or aesthetic for the central hub? It could be blank white, Psychedelic or each of the individual wedges could have a shader representing the corresponding room. Alternately it could have a theme that’s just unique to that room such as sci-fi, or it could be the Nature room itself.
(DoctorWhoAquitaine, 2011)
(408nate08, 2009)
I will still have to learn everything that I would in my original idea with the addition of lighting and organic modeling.